7 MOVES THAT WILL REVEAL HOW FIT YOU ARE

If someone were to ask you what your definition of being fit is, what would your response be? Strong core/abs? Be able to squat your bodyweight? Run a mile? The toe-touch test? While these are all ideal indicators of being fit, they don’t necessarily provide an accurate measure of one’s fitness. A lot of guys think they are fit because they can bench press and squat the world (I used to be one of such people) and have washboard abs. The fact of the matter is how fit a person goes beyond physical strength. Don’t get me wrong, being strong is a renowned gift and warrants acknowledgement. There is more to fitness than being able to Deadlift 300 pounds.

There are several assessment protocols that measure fitness and plenty enough to chose from. But the following are 7 simple tests that can reveal how fit you are and can be done pretty much anywhere using just your bodyweight. These tests will identify strengths, weaknesses and limitations while measuring upper/lower body strength, core strength, cardiovascular endurance, flexibility and mobility.

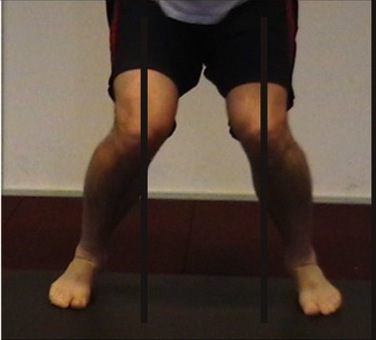
OVERHEAD SQUAT: Using a PVC pipe or a rolled up towel held at slightly wider than shoulder-width apart, bring your hands over your head with elbows fully extended. Your feet should be slightly wider than hip-width. Take a deep breath, brace your core and sit your hips back as far and low as you can while trying to keep your torso rigid.

Things to look for:

-Do your knees cave inward as you descend? (This is caused by weakness and/or poor activation of gluteus medius and other hip external rotators)

-How deep can you squat? Are you able to bring your things to parallel? (Could be a result of tightness in hamstrings and hip external rotators)

-Do your arms, along with the PVC pipe or towel, drift forward during descent? (This could be caused by tight shoulder internal rotators and weak core/trunk stabilizers)

-Are your heels rising off the floor? (Tight/weakness in dorsiflexors and/or ankle instability)

The Fix: Exercises like band-resisted clamshells and side-band stepping are ideal for activating and strengthening gluteus medius which is responsible for knee function and hence better squatting. Regular stretching and foam rolling of the hamstrings and hips can improve depth. Working on external rotation/retraction exercises like band pull-apart and face pull will keep the arms from dropping forward.


SCAPULAR WALL SLIDE: Stand wit your back about a foot or slightly less from a wall. Establish three points of contact against the wall : head, shoulder blades and tail bone. Bring your arms full extended in from of your then pull your elbows back to touch the wall. Point your left and right forearms towards 11 ‘o’ clock and 1 ‘0’ clock. From there, extend your arms up against the wall while trying to keep your wrist and forearms pressed against the wall (creating the letter ‘Y’) . Hold for a second and then bring them back down to your starting position.

Things to look for:

-Were you able to extend your arms up against the wall while maintaining your 3 points of contact and keep them pressed against the wall?

-Did any of your body parts come off the wall during ascent and descent?

-Did you feel any pain/ache during the movement?

The Fix: If you answered ‘yes’ to the first question, congratulations! You have excellent shoulder mobility and flexibility. But if you answered ‘yes’ to the lat two questions, your shoulders are internally rotated thus causing limited mobility in external rotation. This can sometimes come with rounded shoulders or a slouch posture. Interestingly enough, this very test can also be used to correct the issue. Externally-rotated targeted exercises and practicing pulling the shoulders back are the best remedies.


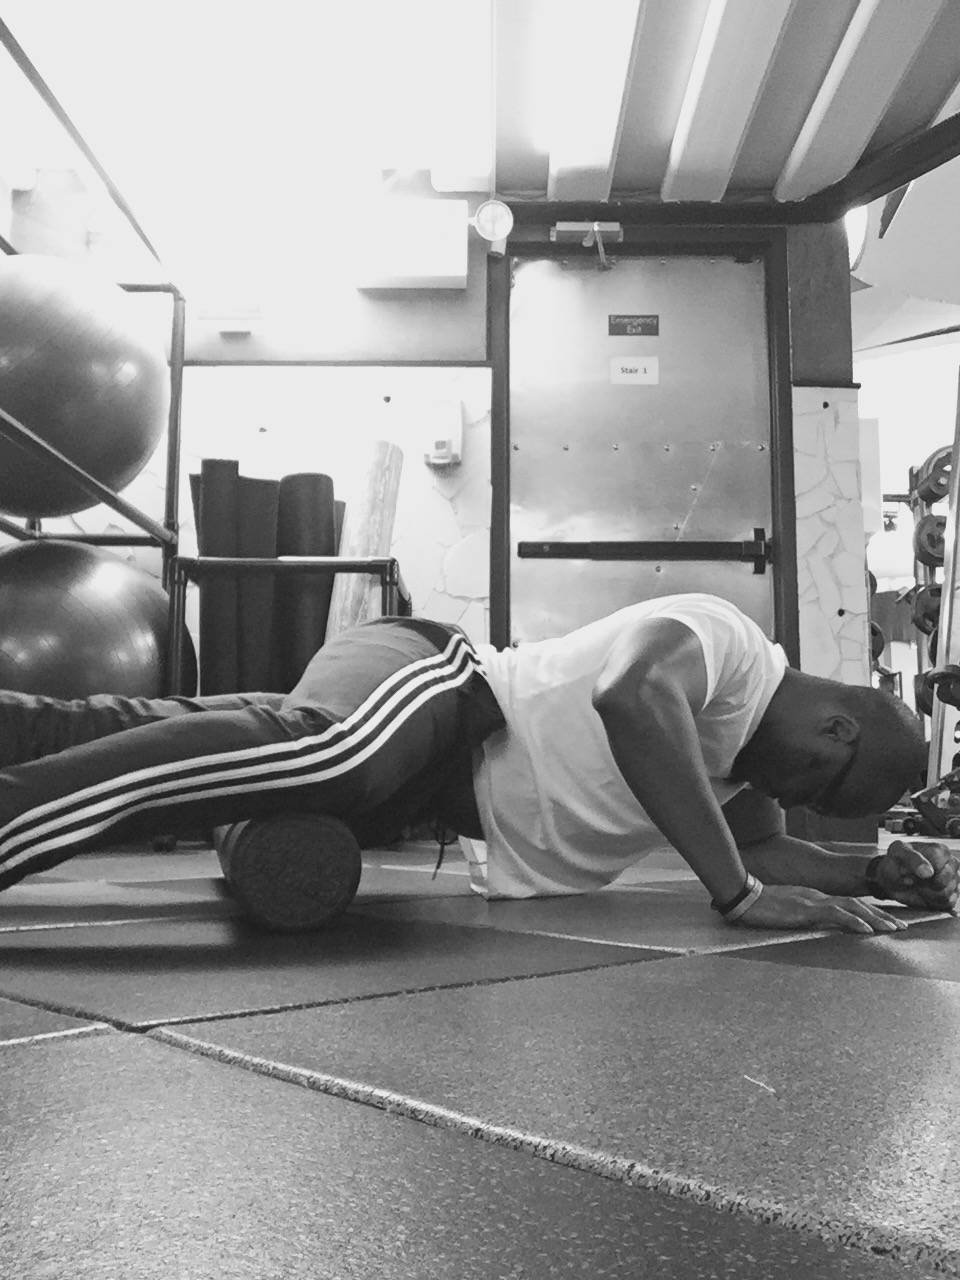
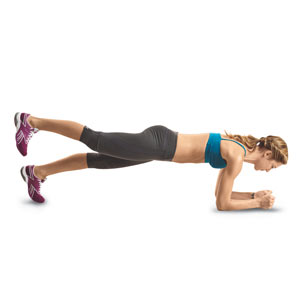
PLANK: I don’t consider the plank to be the best measure of core strength given the fact that it requires a great deal of shoulder strength and endurance. But it can be a good indicator of how strong the anterior core is. With a stopwatch timing you, hold a plank for as long as you can.

Things to look for:

-Are you able to maintain a neutral spine all throughout? (lumbar hyperextension, dropping the head)

-Did you hold for longer or less than 30 seconds?

-Did you hold for longer than 60 seconds?

The Fix: Being unable to maintain a neutral spine during a plank not only means the anterior core is weak. It also means the posterior chain isn’t activated enough to keep the body upright. The gluteus muscles and lumber stabilizers must be strengthened to help correct this. Although not universally accepted, holding a plank for less than 30 seconds could be a sign of a weak core. I believe 45 – 60 seconds is a moderate standard to aim for. The only drawback to the plank is it can be quite difficult for people with preexisting shoulder injury and chronic pain. Either way, gradually work your way up to 1 minute.


TOE TOUCH: Arguably the most premier assessment flexibility test, the toe touch has pretty much been eradicated from many fitness testing protocols. I still consider it a good measure of hamstring and trunk flexibility. So many people have tight hamstrings and not even know it. This simple test will tell you. Standing with your hands along your sides, bend at the waist (trunk hinge) and reach your hands as far as you can towards your toes.
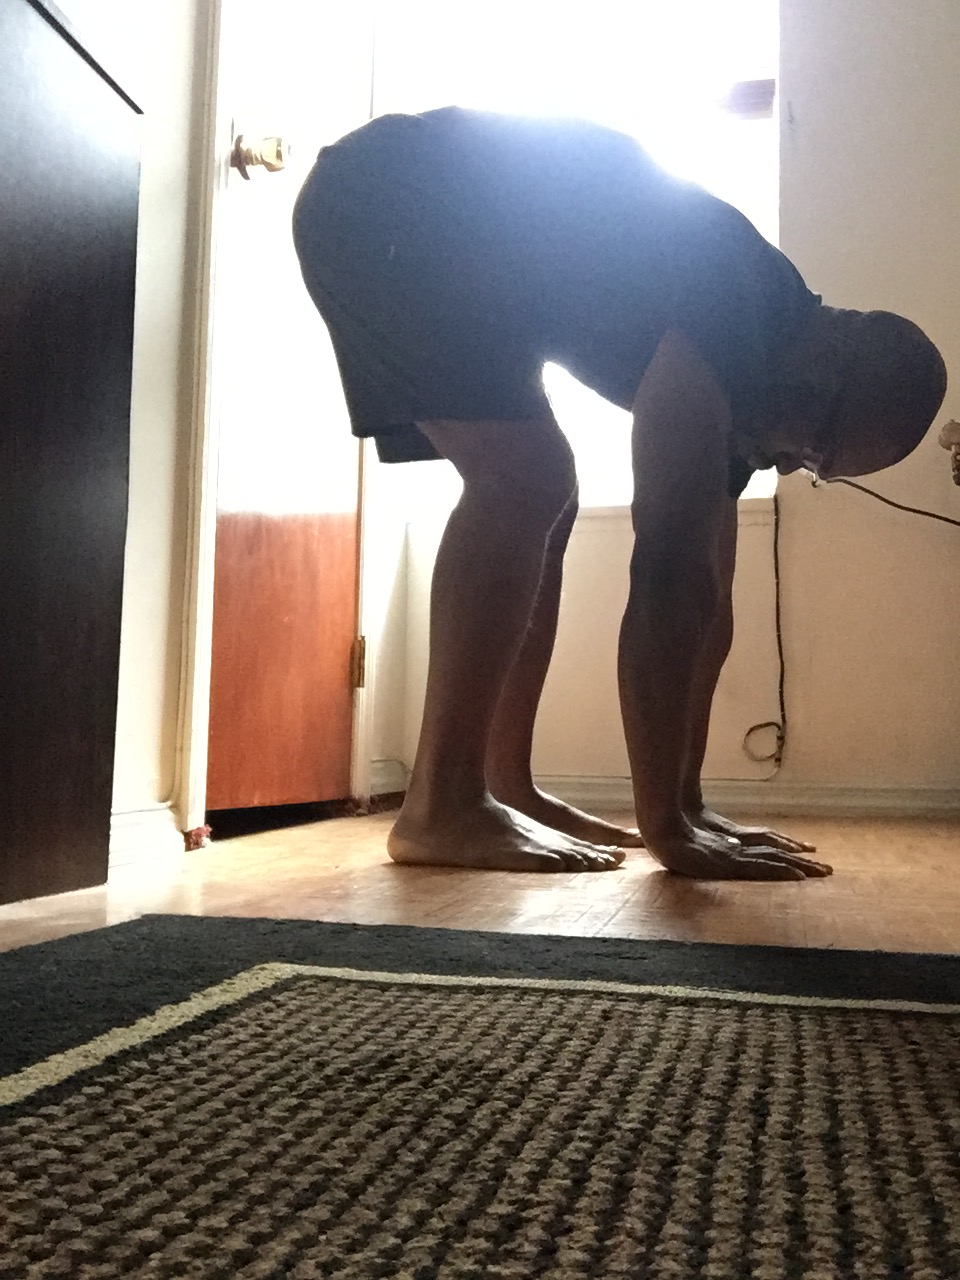
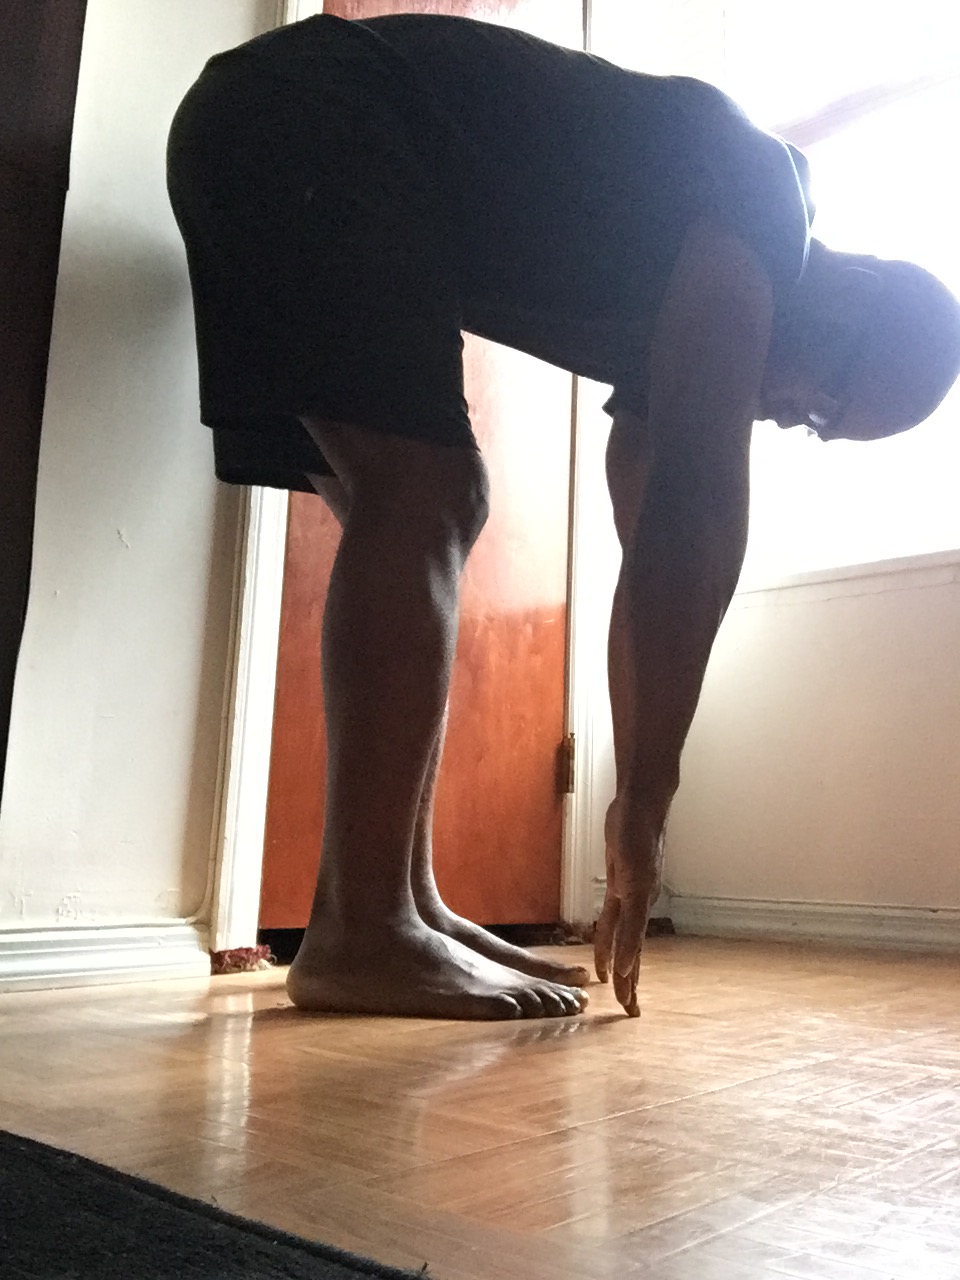
Things to look for:

-Did your hands get past your knees and/or shin?

-Were you able to touch your toes, or better yet the floor?

-How much did you have to bend the knees?

The Fix: If you were only able to reach to your knees and shins, your hamstrings are tight and most likely your lower back too. Being able to touch the toes or the ground indicates great trunk and hamstring flexibility. Although the knees can bend slightly during execution, too much bend devalues and diminishes the test. Correcting the above miscues is simple : lots of passive stretching and foam rolling.


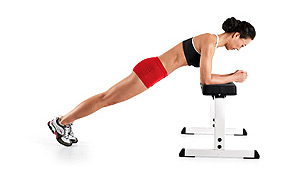
PUSH-UP: Probably the most ancient exercise of our time, the push-up remains a staple in fitness programs. While it can be used as a workout, it can also assess upper body strength and muscular endurance. Perform as many push-ups as you can. When you start getting tried, drop to your knees and continue until exhaustion.

Things to look for:

As with the plank, so many standards exist for the push-up. The way I look at it is the more push-ups you can do without having to kneel, the better and stronger you’ll be. The modified push-up, though a regression of the standard push up, can help build some upper body strength. But it’s alway going to pale in comparison to the regular version in terms of improving and developing strength and endurance.

The Fix: Incorporating lots of anterior core work can help improve push-ups. Doing push ups on higher surfaces like a bench or Reebok STEP can be a precursor to the push-up. Strengthening of trunk stabilizing muscles like the shoulder and triceps can be beneficial also.

BODYWEIGHT SINGLE-LEG RDL:

The Romanian Deadlift is a popular exercise for targeting the posterior chain but can also a good way to assess balance and strength in both legs when done unilaterally with just the bodyweight. With your hands resting along your sides, stand on your right leg and lift the opposite left foot slightly off the ground. Hinge the trunk forward while reaching your hands towards the ground as your left leg lifts up. Aim to perform 6 to 10 reps.

Things to look for:

-How much shifting is occurring at the hips?

-Is the balanced foot/ankle wobbling and/or pronating too much?

-Does your hamstring fatigue enough so much you’re forced to stop?

-How high is the non-balanced leg when fully hinged? Is it in line with the trunk?

The Fix: Hip shifting and lateral movements could be traced to weak and under-active hip external rotators. Band-resisted clamshells and side-band stepping will help with that. Another challenge with this test is wobbling and pronation at the foot and ankle. Doing inversion, eversion, dorsiflexion and plantar flexion with a Thera band is a great way to address this. Generally speaking, single-leg work like lunges, step-ups and single-leg squat variations are vital for strengthening the legs individually. Keep in mind that traditional squats done on both legs, while associated with tons of perks, do not identify which of the legs is working the hardest and and the least.

STAIR CLIMB:

Find a stairwell with lots of floors and climb up 3 to 4 flights at your regular, walking pace.

Things to look for:

-Did you get out of breath?

-If you got out of breath, how soon did it happen?

-Did you find climbing these flights of stairs overly exerting?

The Fix: Stair climbing can be a good way to measure cardiovascular endurance and VO2 Max. The latter is the amount of oxygen available for use during activity. Here’s a simple way to look at it: If after walking 2 or 3 flights of stairs you found yourself breathing heavy, it indicates there wasn’t enough readily available oxygen in your body which means your V02 max and cardiovascular endurance are low. Obviously there’s a limited number of stairs we all can climb before we get tired. Assuming the knees and hips are in good condition, I believe we all should be able to climb a minimum of 4 flights of stairs without getting out of breath. Strength training the lower body and doing a wide variety of cardio activities like HIIT, bootcamp, cycling will surely help improve cardio endurance and VO2 max.

5 ways to spice up your cardio

By now, we all know a combination of cardio and strength training is the best way to achieve and maintain a lean, healthy weight. However, a majority of recreational exercisers hate doing cardio. Many of us find it too boring and monotonous and just doesn’t yield the same high as a strength training session. Although gyms and health clubs are packed with tons of treadmills, only a select few, particularly avid runners, use them regularly. Elliptical machines, stair climber and bicycles are also utilized frequently by fitness enthusiasts but their usage pale in comparison to that of the treadmill. It’s important to point out the dislike associated with cardio is steady-state cardio, i.e. being on a cardio machine for a long time. Most people just don’t like the idea of being stuck on a treadmill or elliptical for 30 minutes.

So what exactly is cardio?

Simply put, cardio is any activity that is rhythmic in nature. The idea is to have the activity rhythmic enough to challenge the heart. Based on that theory, jumping jacks, walking up a flight of stairs, double dutch, and even gardening would be considered as cardio activities. All of the above will raise the heart rate up and require a moderate amount of effort and exertion. The heart rate and its beats per minute (bpm) is perhaps the most common way to measure how challenging a cardio activity is or any activity for that matter. This usually requires several formulas in which certain numbers are plugged in, with the most popular being the ‘220-age method‘ multiplied by a percentage. However, I believe the RPE scale is a better assessment since it takes into account the feel of the individual. You know when you’re working too hard, moderately or with little to no effort.

For those “I hate cardio” folks, there are a plethora of non-traditional cardio options you can consider. Here are 5 good ones:

Circuit Training: This is actually one of the most popular ways of training amongst fitness enthusiasts and has been around for quite some time. Not only is it a good way to save time and get more bang for your buck, it provides both aerobic and anaerobic benefits. You alternate between a minimum of 2 exercises without resting (also known as ‘super-setting’) , before resting briefly and repeating cycle for at least 2 more sets. It’s important that exercises selected for a circuit don’t require maximum effort and should allow for 8-15 reps at an RPE of between 11 and 15.  Below is an example of a sample circuit training program: Perform the exercises marked ‘a’ and ‘b’ consecutively without resting. Rest for 90 seconds after exercise ‘b’ then repeat for 2 more sets before moving on to the second circuit.

1a. Barbell Squat

1b. Push Ups

2a. Jumping Jacks

2b. Burpees

3a. Plank

3b. Side Bridge

HIIT: For those who want a quick cardio session rather than the usual steady-state stuff, High Intensity Interval Training is just that. HIIT gained mainstream several years ago and is a staple in many people’s cardio programs today. It is defined as alternating between bouts of high intensity and low intensity. The heart rate stays high enough during the ‘work’ portion so much that it doesn’t drop too low during the ‘recovery’ portion to yield sufficient fat burning. According to an ACSM study, HIIT has a number of benefits including increasing metabolism, burning more fat than steady state cardio, lowering blood pressure and shrinking abdominal/trunk fat at a faster rate.

There’s no ideal HIIT protocol but a sample HIIT workout I often use and recommend to my clients is running 1 minute hard followed by 1 minute easy/recovery, and repeating for 8 – 10 rounds. If you’re a beginner or your cardio conditioning isn’t as high, you can try 1 minute hard followed my 90 seconds easy/recovery.

TABATA:  An adapted version of HIIT is the Tabata protocol, popularized by exercise science professor, Izumi Tabata in the mid 90’s. Unlike HIIT, which is mostly running and in some cases cycling, Tabata uses whole body movements and exercises done at moderate to high intensity for 20 seconds followed by 10 seconds of rest. This process is performed for a total of 8 rounds or 4 minutes. More than one exercise can be used for Tabata training or simply just one. For example you can set up 8 different stations for each round of Tabata, go through all 8 stations, rest 90 seconds and repeat for 2 more rounds. A single movement can also be used for Tabata providing that movement engages and challenges the whole body.

Some effective exercises for Tabata training are kettle bell swings, kettle bell snatch,  jump squats, high knees, burpees, push press, medicine ball slams, battle rope slams/waves, mountain climbers, sandbag cleans, to name a few.

Bootcamp: This is one of the premier methods of training, dating back to the 80’s. The early days of bootcamp utilized mostly your bodyweight. Exercises like jumping jacks, mountain climbers and burpees were birthed by bootcamp training. Perhaps the greatest perk about boot camp is it can be done just about anywhere, even in your living room. Nowadays, props like medicine balls, battle ropes, stairs and kettle bells are being incorporated for a more effective, fat-burning workout. There isn’t a preferred routine or format when it comes to bootcamp. It has been tried and tested over time and will continue to be effective.

There are thousands of bootcamp workouts to select from and even more bootcamp studios you can attend for a class. It doesn’t matter what you opt for because bootcamp isn’t fading anytime soon.

Jumping Rope: Just like bootcamp, jumping rope has been around for years and also demands a great deal from the body. Forget about the fact that you have to swing this light piece of string over your head and under your feet, simply jumping off the ground repeatedly is a surefire way to get your heart rate up. Everything from your arms, legs, core and trunk stabilizers are used while jumping rope. Most fitness enthusiasts use jump rope as a warm up before a big workout. But it can be utilized solely for a cardio workout. Other folks who jump rope don’t do it long enough or fail to do it well enough to yield benefits. Keep in mind that although the forward jump is the most basic and common jump, there are other jumps that can also be done. Examples are side-to-side jump, backward jump, single-leg jump-left, single-leg jump-right, double jump and  alternating jump to name a few.

Consider this basic jump rope routine: forward jump for 30 – 60 seconds; rest 60 seconds and repeat for a total of 10 rounds. More advanced people can jump for 60 seconds and rest for 30 – 60 seconds.

5 exercises you should stop doing

For a lot of us fitness enthusiasts, working out is an integral part of our lifestyle. We enjoy the sweat, the burn, the pump and more importantly, those endorphins that we release and stay with us long after we leave the gym. By now we know resistance/strength training is essential for weight loss, muscle gain and strength. But with a plethora of exercises out there, it can be overwhelming to find the right ones. The fitness industry is always evolving and newer exercises continue to hit the scene.

But how do you know you’re doing the right exercises? I’m not talking about proper form but rather the selection. While any resistance training exercise is better than none at all, some have better bang-for-your-buck value and will yield more dividends. As a fitness professional/fitness enthusiast who’s been a part of fitness for nearly 15 years, I can say confidently that there are some exercises better left alone.

Here are 5 exercises you should stop doing:

LEG PRESS: A lot of guys are going to balk at me for this but the leg press has zero functional or core value. The seated, upright version may be ideal initially for elderly and deconditioned individuals. But the traditional, incline version can be hard on the knees not to mention its high risk of injury because of the angle. Although most guys, especially bodybuilders who want to build extreme mass, may be able to load a lot of weight, they also risk knee pain and back injuries later on.

ALTERNATIVE: The traditional barbell back squat offers way more bang for your buck while utilizing your core and trunk stabilizers. Also, because you’re moving a load through space, as opposed to your back fixed against a chair, you’ll build more strength and power. As an added bonus, how’s this for a fit nugget: There are over 600 muscles in the body and the squat is known to work at least half of them!

UPRIGHT ROW/BEHIND-THE-NECK LAT PULLDOWN: The upright row is a popular shoulder exercise that made its name during the early era of bodybuilding. It is thought to work the rhomboids and other mid-trap muscles. The behind-the-neck lat pulldown is kind of a modern modification of the traditional lat pulldown. Those who do it routinely claim it targets the mid-trap region very intensely. However several studies have linked these two exercises to acromiclavicular joint injury. The clavicle and acromium make up the AC joint. When the aforementioned exercises are performed, the ligaments around those joints stretch further away causing laxity. This is what ultimately leads to AC joint injuries like a fractured collarbone or torn labrum.

ALTERNATIVE: Face Pulls and Band Pull-Aparts (front or behind the body) are safer bets. They put very little pressure on the AC joint and don’t require a lot of weight to feel the burn.

SEATED HIP ABDUCTION/ADDUCTION MACHINE: I really wish fitness manufacturing companies would stop making these machines. Ladies, you can’t spot reduce! It’s virtually impossible. What’s more alarming is these are two of the most popular and utilized machines in every gym. Yes you may feel a burn when you’re on these machines but the muscles you’re targeting (hip external rotators/adductors) are not getting the proper challenge they need. Being glued on a chair with a back support robs the trunk stabilizers and glutes of adequate firing.

ALTERNATIVE: Band-resisted clamshells and band-resisted side stepping are arguably the two most effective exercises for working the glute medius and other hip external rotators. The sumo squat, sumo deadlift and various lunge variations all do a great job of targeting the inner thighs and several other hip adductors.

DUMBBELL SIDE BEND: I still don’t know why people think the dumbbell side bend target the obliques. Simply put, it doesn’t. In a nutshell, the anatomical motion of the side bend is lateral flexion of the spine. When this movement occurs, the primary muscle that is targeted is a deep muscle on the side of the lower back called Quadratus Lumborum or QL for short. Although there’s nothing wrong withe using the dumbbell side bend to work your QL, you’ll get more perks and benefits with compound movements like the squat and deadlift.

ALTERNATIVE: The side bridge, in my estimation, remains one of the most effective exercises for the obliques. If you have preexisting shoulder pain or just weak shoulders, try doing the side bridge with a hip drop to the ground.

DONKEY KICK-BACKS: Popularized by Jane Fonda in the 80’s, this exercise was the premier movement women used to shape their butts. I still see many women doing it today with ankle weights or resistance bands. The problem with this exercise is 9 out of 10 women I see doing it grossly compensate lumbar hyperextension for hip extension, thereby making it counterproductive. Also, it takes an insanely number of reps to be able to feel a good burn.

ALTERNATIVE: I don’t know if the donkey kick-back will ever be extinct but current literature shows and endorses the hip thrust as the most effective exercise for pure glute activation. Unlike the squat, the hip thrust relies a great deal on the gluteal muscle than the hamstring and lower back during maximal contraction.

My Road To November

“I just feel like it goes against science”

Those were the words of a client of mine during one of our training sessions a few days ago. The “it” he was referring to is running a marathon. Since becoming an avid runner a couple of years ago, I’ve enjoyed every bit of the experience. There’s something gratifying and fulfilling about starting a journey and being able to finish it knowing they were obstacles and hurdles along the way but somehow you managed to persevere and complete the journey. It is this feeling that I love about running, and it is why after running several half marathons, I decided it was time to embrace my next challenge: run a marathon.

The marathon isn’t your typical race. In fact, it is very atypical. The idea that the human body can plough through 26.2 miles sounds ludicrous and crazy. My client and many people in society believe it’s a dangerous event that’s humanly impossible. I get where these people are coming from and I can’t say that I blame them. Heck, running a a half marathon is no cake walk either.

But it all comes down to two things: Mental Toughness & Intestinal Fortitude.

IMG_4424

Although these are two things that can help us be successful in life, they apply a great deal to runners. I enjoy the challenge of seeing how much resolve and willpower I can utilize to get me through a race. Before I ran my first half marathon, the 2015 AirBnB Brooklyn Half, I vowed not to stop regardless of how tired or fatigued I got. I did it, completing that race in 2:09. The average runner can run a mile, a 5K or even a 10K. But it takes a dedicated runner to be able to run a half and full marathon. There’s a process that comes with being able to run 13.1 miles and 26.2 miles. That journey requires sacrifice, preparation and commitment. I live for these things not only because it unleashes the inner warrior in me, it’s also a good measure of my mental toughness and intestinal fortitude.

299706_197416900_Medium299705_197639069_Medium2015 Airbnb Brooklyn Half

Seven half marathons later, including setting a personal best at this year’s AirBnB Brooklyn half with a time of 1:45, it’s time to embrace the challenge of running my first marathon, the TCS NYC Marathon in November. I’m one week into my 16-week training program, which has me running close to 430 miles over the next four months. This is new territory for me so I’d be lying if I said I wasn’t a bit nervous. Running and training for a marathon isn’t anything like a half marathon. In fact, it’s night and day with the two. The marathon isn’t just the ultimate running challenge, it’s also a life challenge for many. For this reason, preparing for it requires serious discipline and commitment. Over the next few months, my life is going to be very regimented as a result of my training. Because of the summer heat/humidity, 5am is when I plan to do my scheduled runs, which means going to bed by 9:30/10 with the hope of getting at least 7 hours of sleep. Although week 1 went pretty well, the thought of doing this for 15 more weeks has me overwhelmed already.

IMG_43292016 AirBnb Brooklyn Half

When I ran my very first race in 2014, (a lousy, lackluster 10K in which my endurance and conditioning were so bad, I peed a little on myself — Gross! I know), no way did I think I’d be training for my first marathon two years later. I even remember saying to myself that I’d never even consider running a half marathon. But challenges are what make life interesting and overcoming them is what makes life beautiful.

I’m nervous but also excited about the journey.


A CASE AGAINST CORRECTIVE EXERCISE TRAINING

Some of you are going to read this headline and immediately begin to raise your eyebrows. So before you begin to vilify me, I’m not opposed to corrective exercise training (For the remainder of this blog post, CET will replace ‘Corrective Exercise Training’). In fact, I do believe CET has its place in fitness and can yield some dividends. I personally incorporate elements of CET into my training and that of some of my clients. For those unfamiliar with it, CET, in a nutshell, is a form of dynamic, nontraditional training created for the sole purpose of addressing  biomechanical problems and faulty movement patterns in the kinetic chain.

It begs the question: Who needs CET? Is it for everyone? How often should it be done within the confines of a training program?

CET started to garner mainstream popularity in the early 2000’s and really took off half a decade later. The National Academy of Sports Medicine (NASM) was the first major certifying organization to offer an accredited certification which is now famously known as ‘Corrective Exercise Specialist (CES)’. Talk to any NASM CES and they will tell you it is the be-all and end-all of fitness. Like I previously stated, I do believe CET can improve and enhance movement but we are spending way too much time on it.

While I think everyone can benefit from CET, I don’t believe everyone needs it. Just because a person isn’t able to descend low enough on a squat or another rounds his/her upper back on a push-up does’t necessarily mean you discontinue those movements and replace with CET. In some cases, all that’s needed is simply stretching, doing deep-tissue work and dynamic drills. I’ve never understood the concept of placing an elastic tubing around the knee to correct a valgus-knee squat. Besides the risk of losing balance and falling, the knees are going to cave back in without the band not to mention the hips/knees are being assisted when they should be gradually learning the movement. If my hip external rotators/abductors are tight and weak, asking me to abduct while performing a squat is going to be a tall order. Furthermore, the hamstrings and adductors are two of the biggest stabilizers during a squat. Performing and perfecting a deep squat simply means stretching and activating those muscles on several occasions.

knee-valgus1

IMG_3565

Many of us, especially those who sit at a desk all day, have internally rotated shoulders ( aka rounded shoulders & slouch posture) meaning our external rotators are tight. If you bench press and do pull-ups on a regular basis, chances are your shoulders are internally rotated. (Try this quick test to assess your shoulder mobility: Stand in front of a mirror in an anatomical position with your hands and palms relaxed and hanging by your sides. Keep your eyes on your left and right thumbs in the mirror. If they point inwards, towards your body, your shoulders are internally rotated.) You don’t have to stop these movements completely, although you may have to lower the intensity and frequency of your bench press and pull-ups if you want to address the issue at hand. Stretching the pectoralis minor and performing shoulder external rotation movements are some of the ways to correct this. But proponents of CET will argue in favor of doing a plethora of  CET exercises and not performing those exercises until the issue is resolved. Where I disagree is that I believe both can be done without discontinuing one completely.

Then there’s this question: How long should one perform CET and to what extent? I’ve seen people, both personal trainers with their clients and regular exercise enthusiasts, who do CET for 30-45 minutes, multiple times a week with no basic movement at all (squat, deadlift, push & pull). The idea is all the body’s weak stabilizers and prime movers must be strengthened before movement can begin. Regardless of how much CET you make me do, I have to perform a skill or movement more than once in order to get better at it. The Principle of Specificity states that clearly. I’ve had first-time clients correct their Deadlifting pattern in one session. It may have required 4 to 5 sets, but they fixed whatever mechanical issues they had at the beginning of the working set. I didn’t have to employ any CET. They simply perfected the movement by doing it over and over and over again.

Here are 4 takeaways:

  1. STRETCH, FOAM ROLL & DYNAMICALLY WARM-UP: It sounds very easy and simple but I’m a firm believer that a lot of our tightness and weaknesses can be addressed via stretching and foam rolling. Stretching the hamstrings/adductors can yield a more efficient squat. Likewise, regularly stretching the pectoralis minor/major will pull our shoulders back and enhance posture. Dynamic warm-ups like X-Band walk, scapular wall slide, cradle walk, high-knee walk and walking spiderman are some of the best activation drills for the glutes, hip abductors/adductors, hip flexor muscles and shoulder girdle. Keep in mind, in order to get the most bang-for-your buck reward via foam rolling, it must be performed routinely and extensively. FullSizeRender
  2. PRINCIPLE OF SPECIFICITY: To be a good cyclist, you must cycle. The point to take away is that a runner should train by running and a swimmer should train by swimming. It’s as simple as that. The Principle of Specificity states that to become better at a particular exercise or skill, you must perform that exercise or skill routinely. Sometimes being unable to perform a movement doesn’t mean there’s a mechanical issue. It could simply mean that movement has to be performed a few more times to achieve perfection.
  3. STRENGTH TRAINING CAN BE CORRECTIVE: The Goblet squat, box squat and many TRX exercises are corrective in nature allowing two birds to be killed with one stone. Take the Goblet squat for example. Placing the elbows inside the knees during descent pushes the knees out leading to an externally rotated hips, which is required to perform a standard barbell back squat. The eccentric phase of a box squat (pushing off out of a seated position) requires more hamstring and adductor firing which can also carry over to a back squat. The TRX Row can promote external rotation of the shoulder while the TRX-assietd squat can teach diagonal neutral spinal alignment.

    4. POST-REHABILIATION CASES: Certain specialty situations may call for a load of CET early on. Athletes and recreational exercisers who tear their ACL or severely injure their shoulder may need to rehab via CET for quite some time before returning to conventional training. Due to the nature of these injuries, modified, regressed and dynamic exercises and drills is the best way to strengthen the surrounding tendons and ligaments.

CET has a rightful place in fitness and can have a great impact on a lot of people. It is definitely here to stay. However it should only be called upon when necessary and not overly implemented. Far too many people continue to use CET even after the issue has been corrected. Dynamic warm-ups and activation drills are very effective in loosening and firing tight and weak areas in the body and should be done on a regular basis. Performing a movement pattern incorrectly for the first time may not necessarily indicate an issue. It very well could mean it needs to be done again and again until perfection is achieved.

How & why I became a runner.

Through the years, I was never too fond of traditional cardio. Science and theory has shown that resistance training complimented with cardio and a healthy diet must be performed routinely to reap the maximal perks of exercise. I hated cardio days early on in my fitness career. In fact, I dreaded them so much I would find excuses not to go. It just doesn’t have the same thrill as bench pressing, deadlifting, shoulder pressing and doing  biceps curl. There’s something more mentally challenging and exhausting about running on a treadmill, cycling on a bike and pedaling on the elliptical than doing strength training exercises. I could spend over an hour lifting weights but 20 minutes of cardio and I’m ready to kill myself! Despite my dislike for traditional cardio, I never stopped doing them.

Then something happened one Sunday morning in the summer of 2014.

The weather was picture perfect. Warm and breezy but not too humid. It was too nice of a day to stay in so I decided to go running at a nearby park that had an outdoor track. I ran 3 miles that day and I remember feeling like I just conquered something big. My endurance wasn’t very good, my lungs got really heavy after mile 1 and I panted heavily. But I still enjoyed the process of finishing. I didn’t think I would do it again but the following Sunday morning, there I was at the same park running again. After a couple of weeks, I increased my mileage to 4. I started to enjoy the feeling of having a goal in mind and going after it. Circling around the park track a number of times began to get boring so a couple of months later, I took my run to the FDR pathway along the East River.

Fastforward to 2015 and I recently competed and participated in the Airbnb Brooklyn half marathon, my first half marathon.

image1With my brother and sister at the finish of the Airbnb Brooklyn Half  Marathon.

Having participated in several races over the last calendar year and many more to come, I now consider myself an avid runner. Strength training will always be near and dear to my heart and my number one passion. But running has become a competitive source of joy for me and I plan to exploit it for as long as I can. There’s a unique challenge that running presents that isn’t quite like that of attempting a Deadlift 1RM or squatting for reps. The latter requires all-out, maximal exertion and power which last for about 90 seconds followed by an extended rest period. With running, there is no rest and there’s no use of force and power. The ability to get from the start to the finish without stopping is a mental challenge unlike no other. Being able to pace yourself so you can finish 4 miles without getting too tired after 2 miles is a unique challenge that many recreational activities don’t have. Basketball and football are our country’s two biggest sports and I happen to a be a big fan of both. The athletes who play those sports are highly conditioned and some of the best in the world. Yet I’d argue that many of them will struggle in a long-distance run.

Though I’ve only been a distance runner for a year, I’ve learned a whole lot. Here are a few of my takeaways:

  • You can muscle your way through a strength training working set but not through running. The ability to maintain a certain pace on a distance run without getting too tired requires mental, intestinal fortitude.
  • The beauty of running a long distance is knowing that there’s a short-term goal in mind : the finish line. This provides more of an incentive to embrace the challenge of the journey.
  • Many runners will stop periodically to catch their breath before going again. The urge not to stop at all is the key. This is the part of running that I personally find most enjoyable and a challenge I gladly embrace.
  • For first time runners, gradually increase your mileage ever week and month. For example, run 2 miles for 2 to 4 weeks before adding another 1 or 2 miles. I made the mistake of increasing my mileage too quickly early on and ended up with some minor aches and pain. As a general rule of thumb for beginners, add no more than a mile or 2 every month but always listen to your body and know when to take a step back if need be.
  • Good, running shoes are a big deal! Sneakers with high, durable heel cushion support are generally the best, though some seasoned runners run with flat sole sneakers. I battled with shin splints and other ankle aches and pain early on and still do today. In some cases you may need insoles or orthotics especially if you pronate. Again, pay attention to your body and see how your running shoes make you feel. As a rule of thumb, replace running shoes every 300 to 500 miles.
  • Stretching and strengthening the muscles of the glutes, calves, hamstrings and quads are very important for efficient running. Those are the muscles that are chiefly responsible for moving the lower limbs during a run. Soft tissue work like foam rolling and using a massage stick on the aforementioned muscles is recommended also.
  • Rest, diet and recovery are just as important as stretching and strengthening. The body must be feed with sufficient complex carbs and energy drinks to supply stored fuel during a run. Longer distance runs (above 6 miles) require more disciplined attention to detail because of the amount of stress the body will have to endure. Sufficient sleep and food the night before, pre-race meal and during-race energy gels/fluids will impact a runner’s performance. The days I’ve had my bad runs were usually preeeded by nights and days when I didn’t get enough sleep or eat enough of the right nutrients.
  • Aches, pain and injuries inevitably comes with the territory. Every runner has had their share of them. The repetitive stress the ankle, knee and hip joints have to endure will eventually cause some discomfort. As far as muscles, the hamstring is the most common site of injury. However the body adapts over time and becomes better equipped to handle the stress going forward. In the event of a running-related injury, take your time to heal fully and don’t risk returning too quickly.
  • Schedule days for cross-training (swimming, elliptical, soul cycle, rowing, etc). This allows the joints and muscles of your legs to recover while still being used at a low-to-moderate intensity.

Some people will never fully embrace running and I can’t say that I blame them. But then again, I used to be one of those people who hated running. Meanwhile I’m planning on running the 2016 NYC marathon.

A year ago, no way would I have ever imagined myself running a half marathon.

Once you control your mind, you can conquer your body.

Anything is possible.

299705_197639069_Medium

R.I.C.E vs. M.E.A.T

For many years, the R.I.C.E protocol has been the benchmark for nursing musculoskeletal sprains and strains (Quick reminder : muscles get strained and ligaments get sprained). It involves Resting the injured area immediately and embarking on treatment. This prevents reuse of the affected area and minimizes the risk of further injury. A big part of the treatment is Icing the affected area several times a day, usually no more than 20 minutes. Compression of the area is the next step and involves keeping the injured muscle or joint as immobilized as possible via bandages and compression garments (sleeves and stockings). The primary objective of icing and compression is to reduce swelling. The final step is Elevation of the injured area to promote and restore blood flow. R.I.C.E has proven to be an effective method for a number of years and is still utilized today by many physical therapists, strength coaches and personal trainers on their clients.

In recent years, a new alternative called M.E.A.T (Movement, Exercise, Analgesic, Treatment) has emerged and is threatening to replace R.I.C.E. Many of the current research and finding on M.E.A.T conclude that it is a more effective method for treating musculoskeletal injuries and here’s why:

Movement: Upon injuring a muscle, our natural instincts is to limit movement as much as possible. The M.E.A.T protocol suggests otherwise. Movement promotes fluid distribution towards and away from the affected area. Tissues of muscles must contract in order for this to happen. For example, an individual nursing a knee sprain can focus on the eccentric phase of the leg extension machine while a runner with an ankle sprain can use calf raises to circulate fluid to the muscles around their knees and ankles. Movements also prevents adhesion (when fascia sticks together and becomes wound up) which is common in musculoskeletal injuries. The bottom line is an injured muscle or joint can still move.

Exercise: This is a piggyback of Movement. Strengthening the muscles of and around an injured area sends fluid and blood to the surrounding muscles. Exercise selection is paramount and must be approached carefully. Because the affected area won’t be 100 percent, modifications and regression of strength training exercises should be called upon if required. This is basically the rehabilitation phase.

Analgesic: This requires the use of over-the-counter and prescription medications to relieve pain associated with an injury. Acute pain can initially make the healing and recovery process more challenging. NSAIDs like Tylenol and Aleve can be used in the early stages but should be discontinued down the stretch. Though they reduce inflammation, too much reduction isn’t good because inflammation is a vital process injured muscles and joints must go through in order to be healed. Keep in mind that too much consumption of NSAIDs can harm the liver so keep the dosage at a minimum. Other analgesic methods include acupuncture and the use of topical agents.

Treatment: This final phase includes lean tissue functional training and balance work to restore strength, mobility and stability in the injured area. It can also include the use of both cold and heat in the early stages of the injury. Keep in mind that cold reduces swelling while heat restores and promote blood flow. Both are crucial in the treatment of musculoskeletal injuries.

In application of both R.I.C.E and M.E.A.T, consider the following:

  • R.I.C.E still has a place in pain management but it should mostly be utilized during the early phase of the injury when the pain is acute.
  • M.E.A.T should ultimately make up the majority of the recovery.
  • New research shows icing may not be as impactful on joints as thought to be. Ligaments have no blood vessels to transport nutrients to surrounding cells and since cooling slows down metabolism and blood flow, it can actually delay recovery of the tissue. As a rule of thumb, apply ice only to a swollen joint no more than 20 minutes, no more than three times a day for no more than 2 days.
  • In some rare cases, inflammation can actually speak up recovery because it is the body’s natural defensive mechanism against injury. The marines have a saying that “pain is weakness leaving the body” which is basically the point here. Some individuals have to go go through and feel the pain during the early part of an injury in order for it to heal.
  • To prevent frostbites, never apply ice directly on the skin. Instead use towels and protective insulating materials to wrap the ice around the injured area. Many health stores like Rite Aid and Duane Reade sell insulated icing wraps.
  • If you’re still in doubt which method to use, talk to your doctor or a licensed fitness professional.

Bodyweight Essential : The Plank

The pull-up & push-up exercises are without question two of the premiere movements in fitness. They remain a staple in building lean muscle and strengthening the upper body. Although not definite but if a third exercise were to follow the aforementioned movements, it’ll be the plank. Arguably the most universally preferred choice for developing the core and abdominals, the plank has been around for years and is as ancient as the squat. Planking requires virtually no equipment and can literally be performed anywhere thus making it a favorite for working the abs amongst many fineness enthusiasts.

The simplest way to get into a plank position is by first getting into a push-up position. From there, bend your elbows to 90-degrees and ensure that your shoulders are directly above your elbows. With your weight resting on your forearms and your legs fully extended, the exercise commences by holding that position for as long as possible. Ensure that there’s alignment from your head through your shoulder blades, butt and feet. The plank is an anti-extension exercise which means the lumbar spine will naturally want to ‘sag’ or go into lumbar extension and you have to resist it for the movement to be effective.

plank_483x350_11161182


When performed correctly, the plank develops the rectus abdominis, anterior core stabilizers, lumbar spine, quadriceps, glutes and shoulders. It requires major involvement of the shoulder girdle thereby making it difficult for those with preexisting shoulder pain. Individuals with chronic shoulder pain should seek out regressed versions of this movement (more on that later). Different metric standards exist for the plank making it difficult to determine what hold time is considered ideal. Some older individuals may not be able to hold a 1-minute plank while a 25-year old female could easily hold a 2-minute plank. As a rule of thumb, hold your plank for as long as possible and until your abs and shoulder start to burn.

For those interested in some challenge and competition, the world record for the longest plank belongs to Mao Weidong of China with a time of 4 hours 26 minutes and was set in September 2014.

If you enjoy doing the plank and would like to add some new challenges, here are a few progressions:

1. Body Saw Plank: This progression of the plank requires a TRX, stability ball or gliders. Set up the way you would for a regular plank but with your feet and legs placed on top or attached to either of the aforementioned accessories. From that position, glide your entire body back as far as possible while keeping your forearms stationary and then glide it forward as far possible again. If using a stability ball, the forearms should be mounted on a bench with legs extended on the ball. The advantage of the body saw plank is that it’s quick and it eliminates what could potentially be a long hold time. This is ideal for individuals pressed for time.

2. Plank on a Stability Ball: The unstable surface of a stability ball presents a unique challenge. Going from planking on the floor to planking on an unstable surface proprioceptively forces the body to adapt to new demands. Balance and motor control are enhanced thus forcing the abdominal muscles to react in a way it never did with the conventional plank. Variations include legs on ball/hands fully extended on the floor, forearms on ball/feet on the ground, hands fully extended on ball/feet on the ground and forearms on bench/legs extended on ball. Due to the advanced nature of this exercise, many people will have a hard time mastering it initially. Take your time in perfecting the old-fashioned plank before adding this progression to your routine.

exercise-ball-planks_-_step_2.max.v1stability-ball-plank-ex_0stability-ball-plankswiss-ball-plankfeetbench-male


3. Lifting One Leg/One Arm Up: This is a very challenging progression of the plank so it must be carefully performed. This progression is performed by either lifting one leg up or one arm so you’re planking on only 3 of your 4 limbs. To plank on leg, simply lift either your left or right leg just a few inches off the ground. A higher lift will result in more gluteal activation. To plank on one arm, take one hand off the ground and extend it in front of your or place it on your opposite shoulder. The latter requires the hands to be fully extended. With either progression, the body will naturally want to rotate and you must resist falling to one side. The anti-rotation component coupled with anti-extension makes this progression ideal for strengthening the entire abdominal region.

1101-plank-leg-liftPlank-1-arm-popsugar.com_IMG_2640


4. Plank Push-Up: This creative plank progression combines a traditional plank and a push up making it a great bang-for-your-buck choice for effectively targeting the abdominals, chest, triceps  and anterior deltoid. To perform this exercise, assume a plank position. From there, extend both your elbows one at a time until you’re in a full push-up position. Reverse the actions by bending both of your elbows and return to a plank. You can alternate hands or continually push off the same hand, though the former is more effective because both arms will be put to work. Intensity can be measured in reps (from plank position to push-up is 1 rep) or timed.

For those dealing with chronic shoulder pain, planking on a bench can be just as effective as planking on the floor. While holding until the abs begin to get a good burn is always recommended, the exercise should be discontinued if the shoulder region begins to flare up. Individuals with torn shoulder labrums and rotator cuff injuries should be especially conscious of this. This regression is also ideal for beginners who lack adequate core strength.

45-plank-female


If you routinely perform planks and have never done any of the progressions, trying adding some of them to your workouts. Most plank variations can be done anywhere which means you can do them in the office on a quick break or at home during a TV commercial break of your favorite shows. Exercises like Deadlift, Squat and Overhead Press can improve plank strength and hold time because of the recruitment of the lumbar muscles in the aforementioned exercises. It’s no surprise that individuals who are great at planking also perform compound movements.

I’ll talk about the side plank (the sister exercise to the traditional plank) on another post.


Bottled Water Vs. Tap Water : Which is better?

Water is arguably the most essential nutrient for mankind’s survival. It is as important to the human existence as air itself. Water plays a plethora of roles in the body such as cleaning out toxic waste, aiding in digestion, strengthening the immune system, weight loss and increased energy to name a few. Fortunately for many of us in the western world region, we have unlimited access to water which is certainly a good thing.

However, in recent years, several debates have emerged as to what type of water is the best. Most water drinkers, and an overwhelming majority of fitness enthusiasts, drink bottled water. Poland Springs, Dasani, Smart Water and Aquafina are some of the top brands of water that grace the floors of fitness centers. Not too many people drink tap water for fear of contamination and uncleanliness. In fact there are perceptions among water drinkers that tap water shouldn’t be consumed at all and can cause harm to the body.

So is tap water really unsafe for us?

Well, not exactly.

The Environmental Protection Agency (EPA)  is the United States Federal Agency that regulates water in America. This means water goes through inspection for safety before it is run through pipelines to our homes. In 1974, the EPA passed the Safe Drinking Water Act (SDWA) which stipulates that safe, drinking water must be inspected and made available to the public. According to the EPA, tap water, if regulated, is just as safe as bottled water. Although bottled water is regulated by the Food & Drug Administration (FDA), it isn’t any safer or cleaner than tap water. The mere thought that water is packaged and presented in a sealed bottle gives water drinkers the belief that it is superior to tap water. This doesn’t mean bottled water isn’t safe. The EPA regulates and monitors tap water just as strictly as the FDA does to bottled water.

If you’re indecisive about what type of water to drink, here are a few things to consider:

Geographical Area: Thanks in large part to their population, New York and San Francisco have some of cleanest water in the country. In fact most inner cities have clean water. However, rural areas and farming towns may not be so lucky. If you live in one of these area, contact your local water agency and have them come test your water. Dialing 311 and speaking with an operator may also provide some useful information about your town’s water supply. The EPA website has tons of information on how to assess the safety of your water.

Use A Filter When In Doubt: Water filters have made it easier to comfortably ensure that the tap water we drink is clean and purified. The primary objective of a water filter is to remove contaminants and harmful chemicals from tap water. Top brands like Brita even highlight the exact contaminants that are targeted during filtering. Some modern filters can actually be attached directly to your faucet so water quickly goes from unfiltered to filtered as it gushes out. Keep in mind that many bottled waters are in fact filtered tap water so you may be better off filtering your own water while saving money and plastic.

Know The Source Of Your Water: Most big cities get their tap water from a community public water system that is supported by the SDWA. However in some rural towns, water supply is drawn from private wells. It is important to know that the SDWA does not cover private wells and bottled water. If your town’s source of water is a private well, your water could be at risk for chlorine and other hazardous organic chemicals. Many houses built during or before the 1970s contain lead-containing pipes which could also contaminate the water in the house. In both of these cases, contact your local water agency and have them come run a water test.

Special Situations Call For Bottled Water: Some people with unique medical conditions are better off drinking bottled water. Cancer and HIV patients can be very sensitive to even the smallest contaminant from tap water, especially while on certain medications. Drinking tap water of even filtered can reduce the functionality of the immune system. If you’re one of these people, ask your doctor for the best option.

Simple ways to fix muscle aches and pains

I can almost certainly say with conviction that virtually every person I know has some type of body ache, discomfort, pain and/or inflammation. The fact of that matter is as impactful as exercise is on the body, it inevitably won’t prevent us from experiencing some sort of muscle ache or pain at some point in our lives. For the majority of us, the stress and demands of life, work, school, companionships, family time and even gym time will ultimately fatigue the body and cause it to function less optimally in most cases.

How many times have you or someone you know felt a back ache, shoulder tightness or hip discomfort and wondered where it came from? That’s because when muscles are stressed repeatedly via strength training, home chores, manual labor, prolonged seating to name a few, the deep fascia of muscle fibers (innermost muscles tissue that surround bones, nerves and blood vessels) become wound and tangled up and begins to limit movements which can affect range of motion. On the contrary, superficial fibers are what we stretch on the surface and body of the skin like a basic lying hamstring stretch for example.

Here are 4 ways to to permanently fix and cure your aches and pains:

1. Soft Tissue Work: If you don’t already include soft tissue work in your exercise program, you ought to. Foam rollers, lacrosse/tennis ball and deep tissue massages make up this elite category. I believe it is one of the most underestimated areas of body care and maintenance. Soft tissue work can be unpleasant. In fact, it isn’t pleasant at all. If you’ve ever used a foam roller or lacrosse/tennis ball on your self, you know the feeling I’m referring to. Though painful and uncomfortable, soft tissue work allows collagen fibers of those deep fascia to untangle and loosen up, thus promoting efficient blood flow in muscles. This in turn translates into warmer and more relaxed muscles and better mobility in the joints.

2. Stretching: We all need to stretch more. It’s as simple and blunt as that. It’s quite alarming how many seasoned fitness enthusiasts lack adequate flexibility (Don’t worry, I’m one of them!). Part of the problem is that when it comes to relieving stress and endorphins kicking in, stretching pales in comparison to traditional strength training and just ins’t considered “fun”. As a result, many of us do it infrequently and when we do, it’s quick and fast. Here’s the thing: Stretching may not yield the benefits of a barbell squat or bench press, it is a vital component for movement patterns. To move efficiently and effectively, we must stretch. Tendons connect muscles to bone so in order for a joint to function well, the muscles around it must be stretched. Passive and PNF stretching are the best types and can be done anytime. While it’s important to stretch the entire body, emphasis should be placed mostly on tight muscles.

3. Corrective Exercise Training: This has been one of the most controversial areas of fitness over the last several years. By definition, corrective exercise training is the fixing of imbalances, weaknesses and muscle pain via traditional and nontraditional methods of training. It has become a staple in many training programs and a mainstream component of fitness. Corrective exercises were originally designed to fix and correct muscular imbalances that affect movement patterns, fix injury-related pain and alleviate chronic muscle tightness.

I’m all for using corrective exercises when warranted. However, it appears many exercise enthusiasts & fitness professionals today design their programs strictly around corrective exercise and that bothers me. If the underlying issue has been corrected, why keep correcting? If you’re unable to hinge low enough in a squat, strengthening and activating your hip external rotators and stretching your hamstrings & adductors should be part of the corrective remedy. Once those areas are addressed, it’s time to squat. Many people continue to utilize corrective training even after the problem is addressed. I’m a proponent of corrective exercise training and I believe it has a place in fitness. But it shouldn’t be overused and definitely shouldn’t make up an an entire workout program. Regardless of the individual or training goals and objectives, compound movements should always take precedence. They’ve been tried and tested over time.

4. Progressively Overloading: Most of us know in order to continue to see results and yield dividends, we must continually add new challenges to out workouts, whether it be more resistance, less rest between sets, more sets and/or more reps. However some of us overload too soon, not allowing the body to adapt to the early demands. Progressive Overload, gradually adding resistance to strength exercises, must be approached steadily. Going from bench pressing 100 pounds in week 1 to 150 pounds in week 2 may be too much of an overload. The central nervous system gets a shock each time we exercise, which forces the muscles of the body to respond by getting strong and growing. However if the shock goes from a mild state to a more severe state, the joints and muscles panic at the arrival of an unexpected tension and that usually causes injury. Think of it as a first time driver who goes from driving at 55 mph in week 1 to all of a sudden 85 mph in the second week. It’s very likely that new driver will be not be comfortable at 85 mph in only his/her 2nd week of driving and may lose control of his/her vehicle. Whether you’re a newbie in the gym or a seasoned lifter who took a month off, always start with a mild to moderate intensity and progressively and wisely overload.