Bodyweight Essential : The Plank

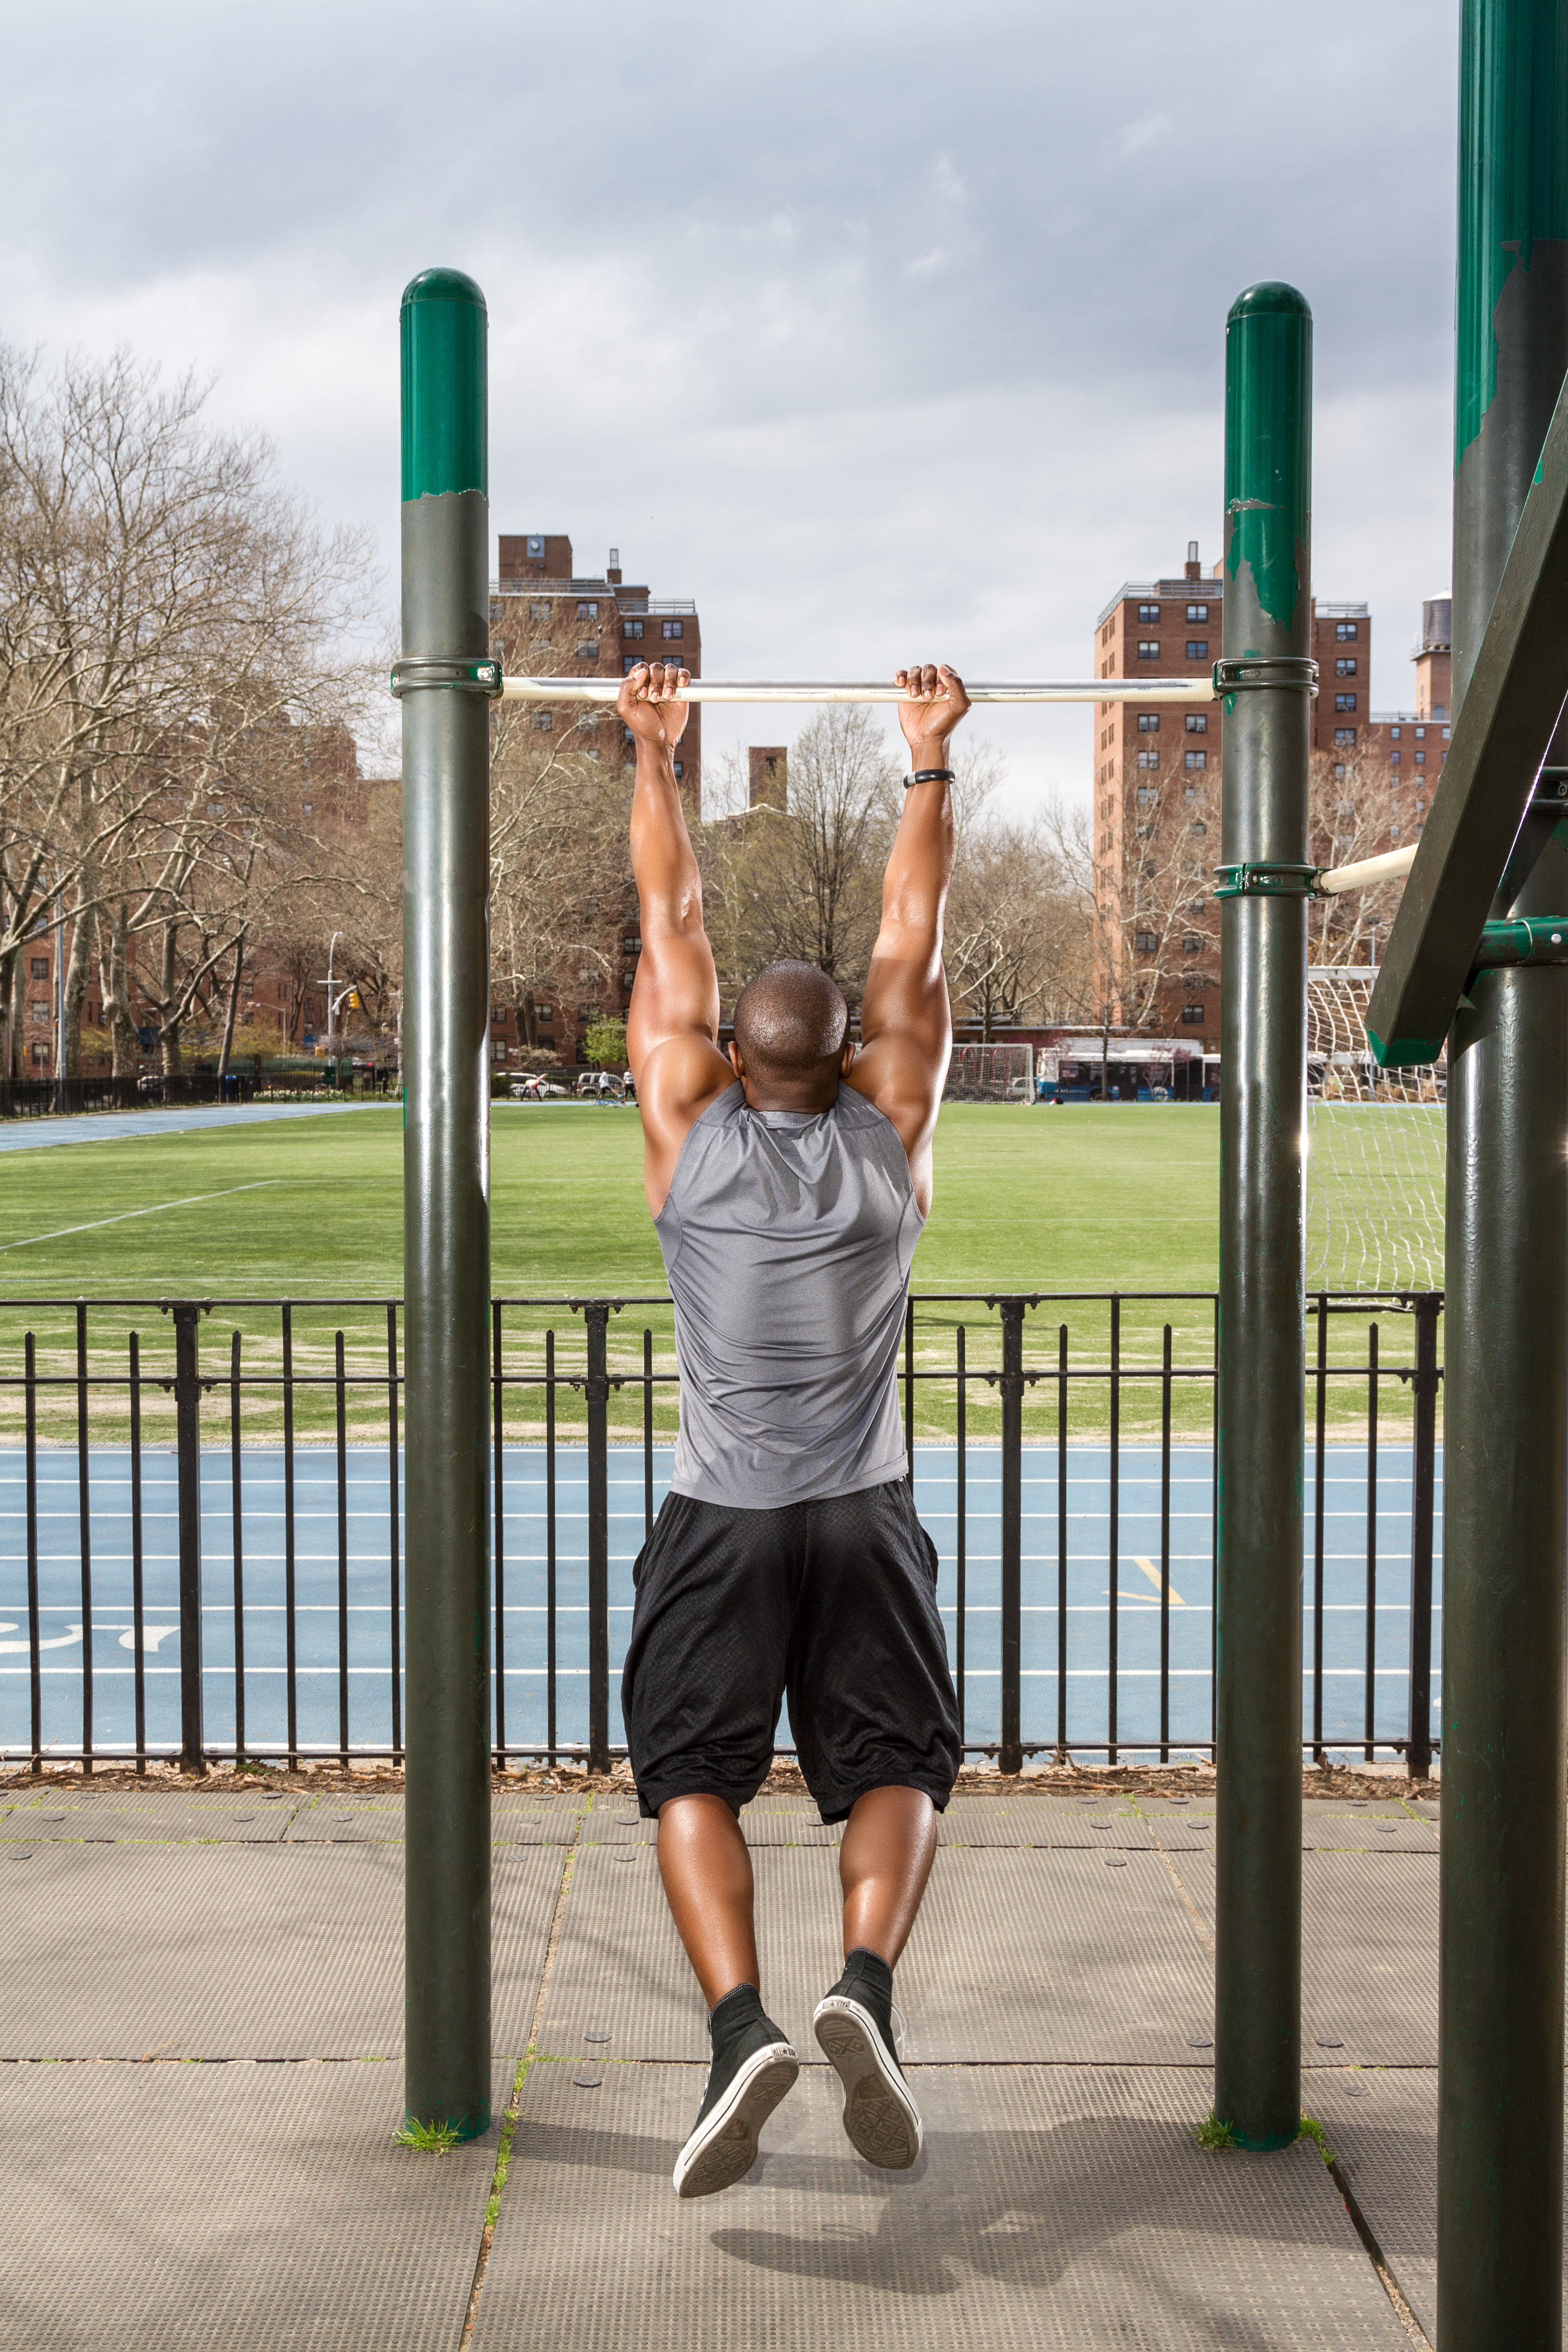
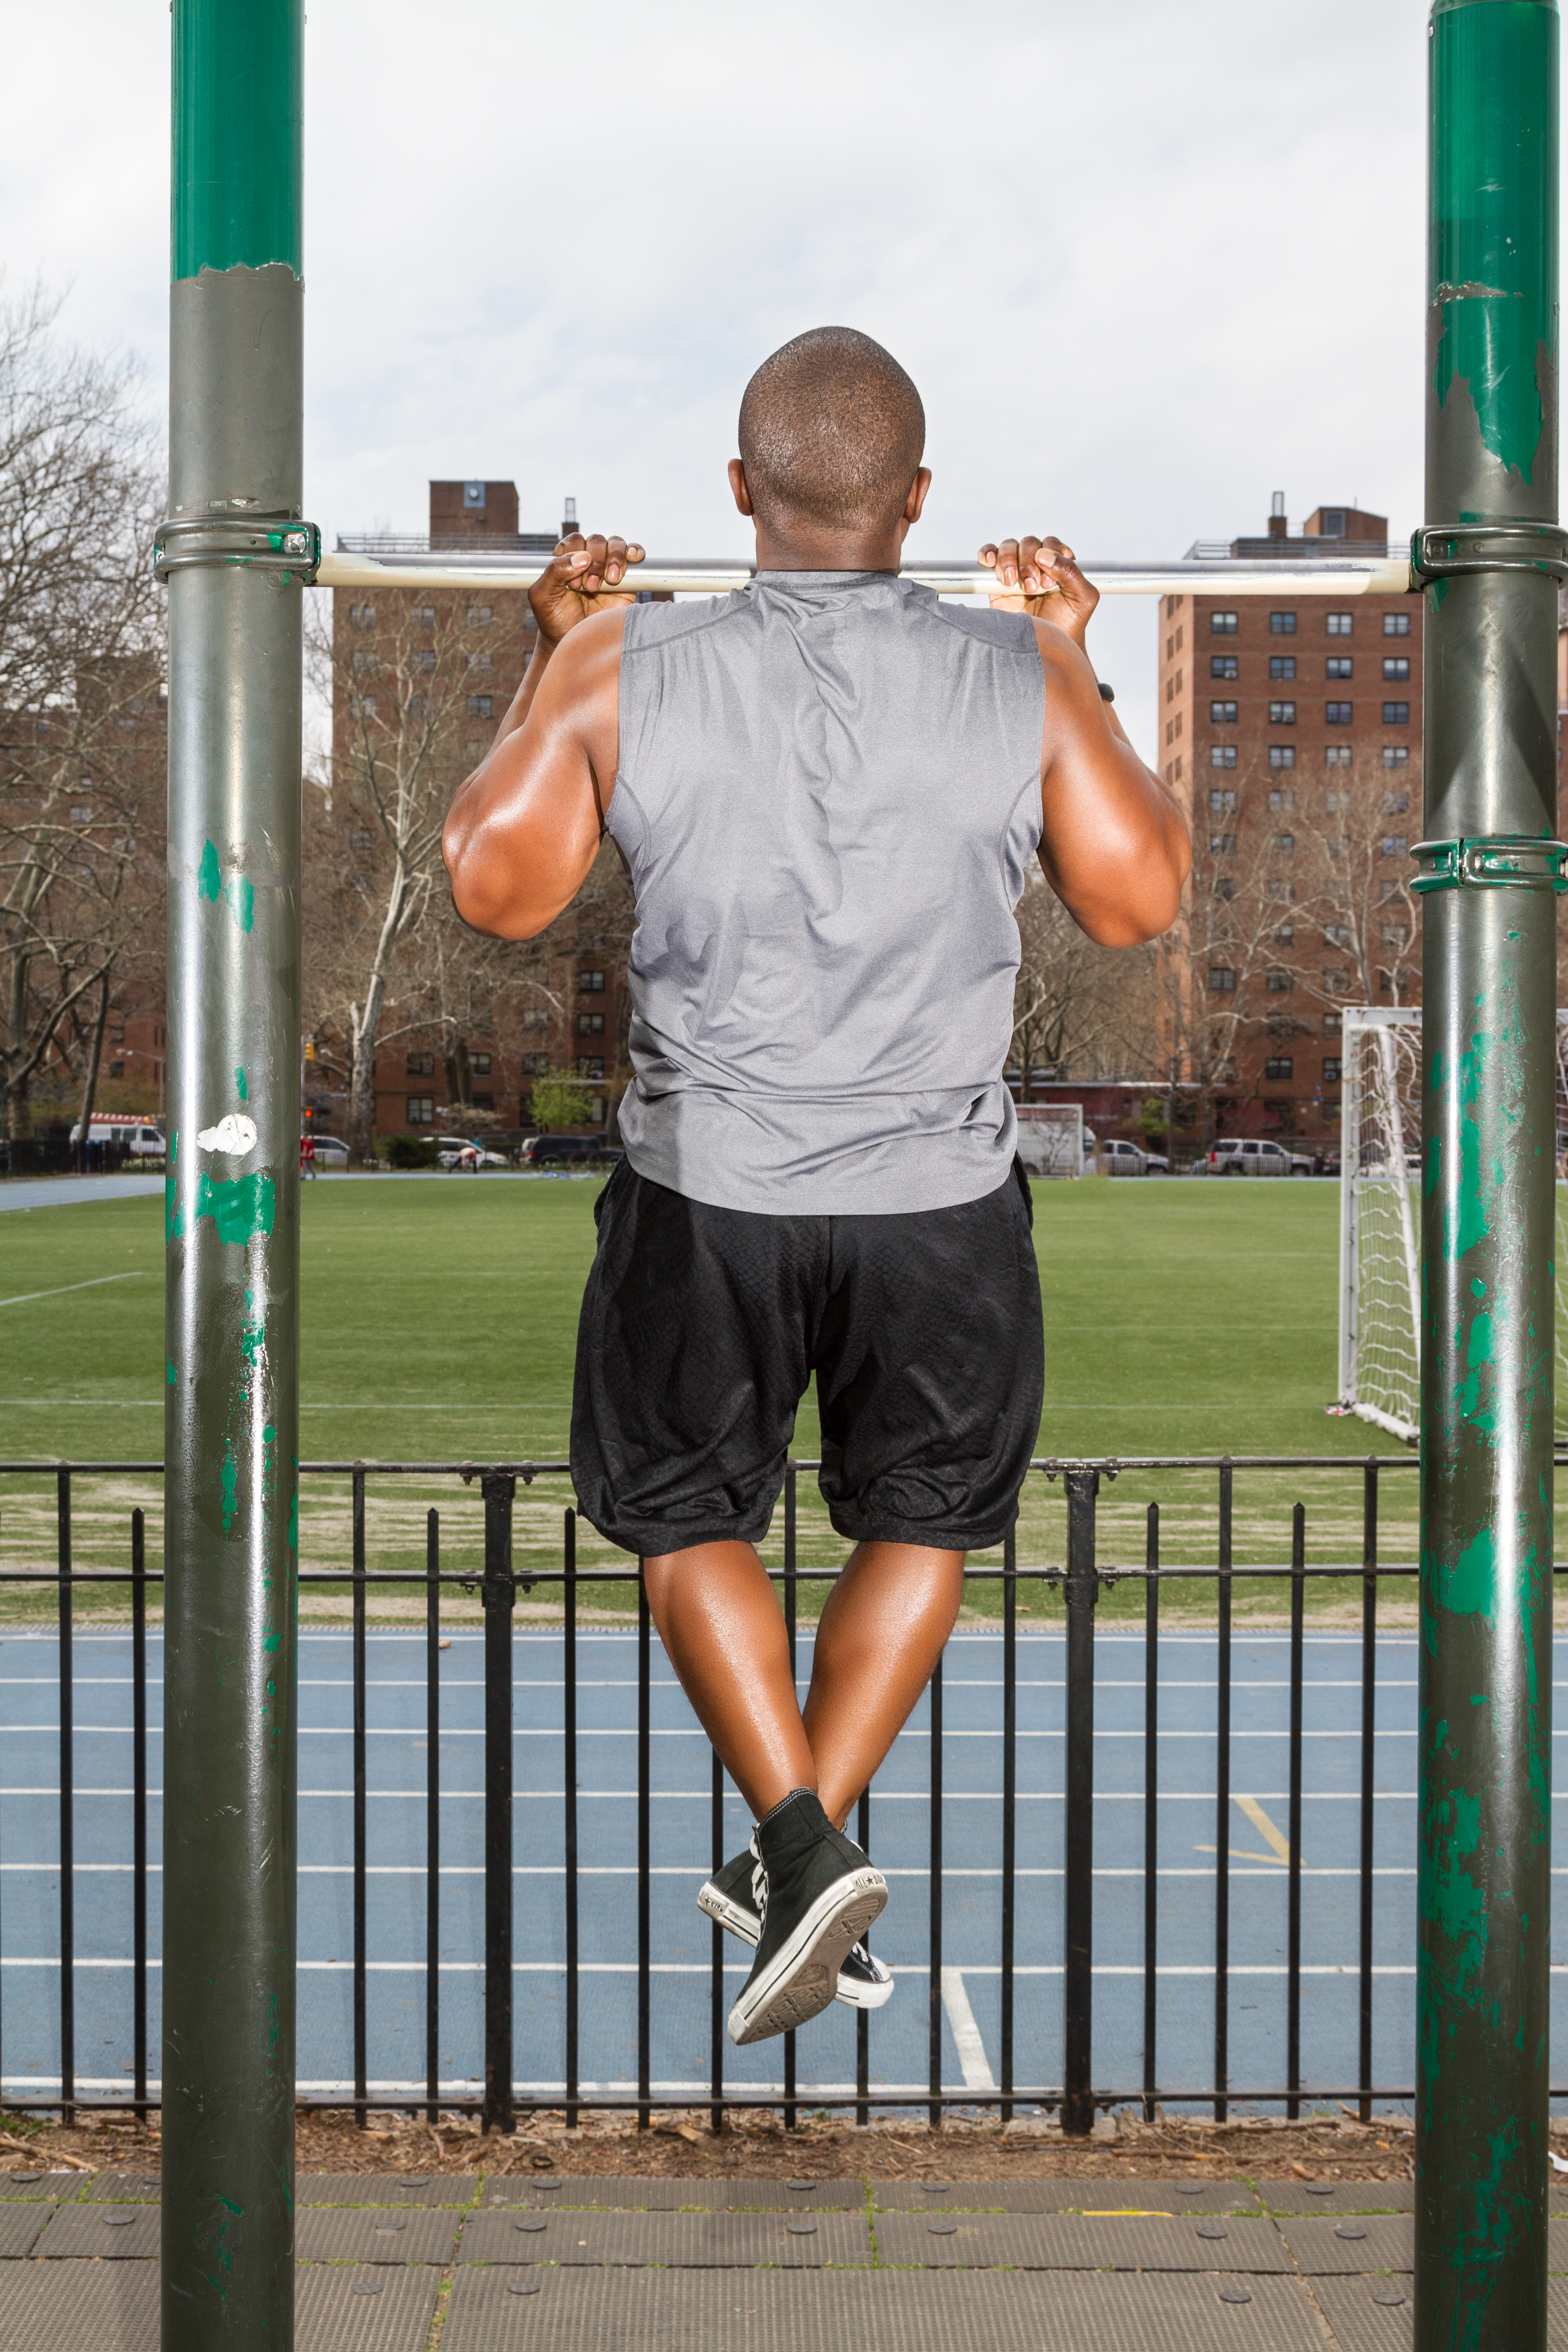
The pull-up & push-up exercises are without question two of the premiere movements in fitness. They remain a staple in building lean muscle and strengthening the upper body. Although not definite but if a third exercise were to follow the aforementioned movements, it’ll be the plank. Arguably the most universally preferred choice for developing the core and abdominals, the plank has been around for years and is as ancient as the squat. Planking requires virtually no equipment and can literally be performed anywhere thus making it a favorite for working the abs amongst many fineness enthusiasts.

The simplest way to get into a plank position is by first getting into a push-up position. From there, bend your elbows to 90-degrees and ensure that your shoulders are directly above your elbows. With your weight resting on your forearms and your legs fully extended, the exercise commences by holding that position for as long as possible. Ensure that there’s alignment from your head through your shoulder blades, butt and feet. The plank is an anti-extension exercise which means the lumbar spine will naturally want to ‘sag’ or go into lumbar extension and you have to resist it for the movement to be effective.

plank_483x350_11161182


When performed correctly, the plank develops the rectus abdominis, anterior core stabilizers, lumbar spine, quadriceps, glutes and shoulders. It requires major involvement of the shoulder girdle thereby making it difficult for those with preexisting shoulder pain. Individuals with chronic shoulder pain should seek out regressed versions of this movement (more on that later). Different metric standards exist for the plank making it difficult to determine what hold time is considered ideal. Some older individuals may not be able to hold a 1-minute plank while a 25-year old female could easily hold a 2-minute plank. As a rule of thumb, hold your plank for as long as possible and until your abs and shoulder start to burn.

For those interested in some challenge and competition, the world record for the longest plank belongs to Mao Weidong of China with a time of 4 hours 26 minutes and was set in September 2014.

If you enjoy doing the plank and would like to add some new challenges, here are a few progressions:

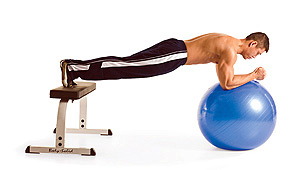
1. Body Saw Plank: This progression of the plank requires a TRX, stability ball or gliders. Set up the way you would for a regular plank but with your feet and legs placed on top or attached to either of the aforementioned accessories. From that position, glide your entire body back as far as possible while keeping your forearms stationary and then glide it forward as far possible again. If using a stability ball, the forearms should be mounted on a bench with legs extended on the ball. The advantage of the body saw plank is that it’s quick and it eliminates what could potentially be a long hold time. This is ideal for individuals pressed for time.

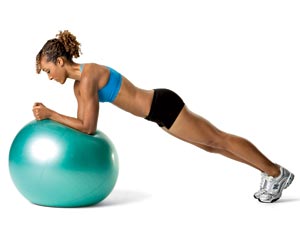
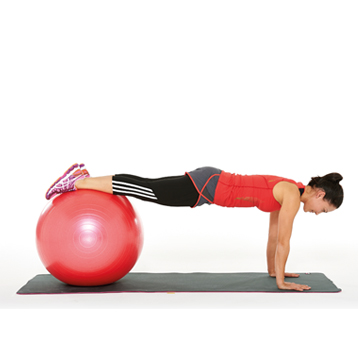
2. Plank on a Stability Ball: The unstable surface of a stability ball presents a unique challenge. Going from planking on the floor to planking on an unstable surface proprioceptively forces the body to adapt to new demands. Balance and motor control are enhanced thus forcing the abdominal muscles to react in a way it never did with the conventional plank. Variations include legs on ball/hands fully extended on the floor, forearms on ball/feet on the ground, hands fully extended on ball/feet on the ground and forearms on bench/legs extended on ball. Due to the advanced nature of this exercise, many people will have a hard time mastering it initially. Take your time in perfecting the old-fashioned plank before adding this progression to your routine.

exercise-ball-planks_-_step_2.max.v1stability-ball-plank-ex_0stability-ball-plankswiss-ball-plankfeetbench-male


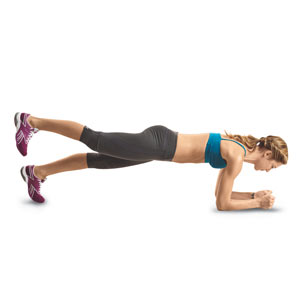
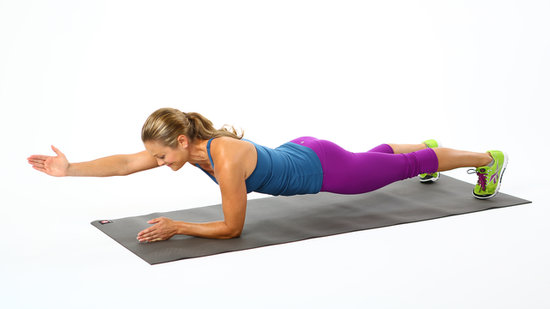
3. Lifting One Leg/One Arm Up: This is a very challenging progression of the plank so it must be carefully performed. This progression is performed by either lifting one leg up or one arm so you’re planking on only 3 of your 4 limbs. To plank on leg, simply lift either your left or right leg just a few inches off the ground. A higher lift will result in more gluteal activation. To plank on one arm, take one hand off the ground and extend it in front of your or place it on your opposite shoulder. The latter requires the hands to be fully extended. With either progression, the body will naturally want to rotate and you must resist falling to one side. The anti-rotation component coupled with anti-extension makes this progression ideal for strengthening the entire abdominal region.

1101-plank-leg-liftPlank-1-arm-popsugar.com_IMG_2640


4. Plank Push-Up: This creative plank progression combines a traditional plank and a push up making it a great bang-for-your-buck choice for effectively targeting the abdominals, chest, triceps  and anterior deltoid. To perform this exercise, assume a plank position. From there, extend both your elbows one at a time until you’re in a full push-up position. Reverse the actions by bending both of your elbows and return to a plank. You can alternate hands or continually push off the same hand, though the former is more effective because both arms will be put to work. Intensity can be measured in reps (from plank position to push-up is 1 rep) or timed.

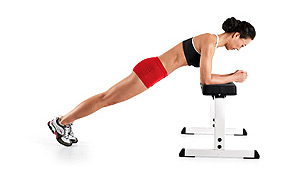
For those dealing with chronic shoulder pain, planking on a bench can be just as effective as planking on the floor. While holding until the abs begin to get a good burn is always recommended, the exercise should be discontinued if the shoulder region begins to flare up. Individuals with torn shoulder labrums and rotator cuff injuries should be especially conscious of this. This regression is also ideal for beginners who lack adequate core strength.

45-plank-female


If you routinely perform planks and have never done any of the progressions, trying adding some of them to your workouts. Most plank variations can be done anywhere which means you can do them in the office on a quick break or at home during a TV commercial break of your favorite shows. Exercises like Deadlift, Squat and Overhead Press can improve plank strength and hold time because of the recruitment of the lumbar muscles in the aforementioned exercises. It’s no surprise that individuals who are great at planking also perform compound movements.

I’ll talk about the side plank (the sister exercise to the traditional plank) on another post.


5 Nontraditional Ways To Workout With Minimal Gym Equipment

By now we know that in order to lose weight, build lean muscle and get strong, resistance training has to be routinely performed. For many of us who resistance train, barbell and dumbbell exercises form the foundation of our workouts and rightfully so. However, there are some of us who may not always have access to a gym to perform a barbell squat or deadlift. Furthermore, there are also people who have to travel for work so much that they end up spending more time in hotels than at their homes.

Not having access to a gym can be discouraging for fitness enthusiasts and while a hotel gym is encouraging for those who travel a lot, many of them lack the basic equipment. The good news is that resistance training can be performed and even made challenging without the use of barbells, cable machines and dumbbells.

Here are 5 nontraditional ways to resistance train:

1. BODYWEIGHT TRAINING : This is unquestionably the easiest and simplest way to workout the body because all you need is your bodyweight and decent amount of room. The human body is designed to move in a plethora of directions and planes so multi-planar movements are made available. Keep in mind that in order to illicit a good physiological response from bodyweight exercises (Here’s my top 10 list), a structured program which allows for supersets, progressions and a short amount of rest is recommended. For example, if you can easily do 20 push-ups with minimal effort, try progressing to both feet elevated on a bench or lift one leg up.

Sample Bodyweight Training Program: Perform the exercises in each group 3 times, completing a group first before moving on to the next.

A1) Bodyweight Squat

A2) Push-Up

A3) Plank

B1) Reverse Lunge

B2)  Pull/Chin Up (If no access to a bar, then substitute for Scapular Wall Slide)

B3) Side Bridge

C1) Burpees

C2) Jumping Jacks

2) TRX SUSPENSION TRAINING : TRX training has become a mainstream phenomenon and it’s here to stay. Just like bodyweight training, TRX training can be done virtually anywhere, however it allows for more progressions and challenges than bodyweight training. What I like about the TRX is that nearly all the exercises force the core musculature to work a little harder than in a traditional setting because the body will always try to resist movement in every plane.

Sample TRX Workout: Perform the exercises in each group 3 times, completing a group first before moving on to the next.

A1) TRX Squat OR Single Leg Squat OR Overhead Squat

A2) TRX Push Up

B1) TRX Bulgarian Split Squat

B2) TRX Inverted Row

C1) TRX Roll-Out

C2) TRX Mountain Climbers

3) KETTLEBELL TRAINING : Although Kettlebells have been around for quite some time and a bit popular than the TRX, it appears that the only exercise I see most Kettlebell users do is the Kettlebell Swing. The Swing is by far the most popular KB exercise and a great one too. But there are  a multitude of exercises that can be performed with the KB. It’s important to know that handling of a KB requires thorough practice and possibly  coaching so if you’re unfamiliar with some movements, take time in learning the nuances first.

Sample Kettlebell Program: Perform the exercises in each group 3 times, completing a group first before moving on to the next.

A1) KB Front Squat (Unilateral or Bilateral; If Unilateral, perform the same number of reps on other side)

A2) KB Row (45-degree trunk hinge. Unilateral or Bilateral; If Unilateral, perform the same number of reps on other side)

B1) KB Single-Leg RDL (Contralateral)

B2) KB Push Press (Unilateral)

C1) KB Clean

C2) KB Swings

4) RESISTANCE BANDS :  Another inexpensive way to workout from a nontraditional perspective is the use of bands. Although the resistance bands with handles are the most popular, other versions like the thera-band and monster bands also exists. The resistance and monster bands allow for the most variety. Bands have the biomechanical advantage of constantly keeping tension in the muscles due to the elastic nature of them. This tension inevitably puts more emphasis on the concentric portion on the lift because it discourages you from relaxing or resting too long during the eccentric phase.

Sample Resistance Band Workout: Perform the exercises in each group 3 times, completing a group first before moving on to the next.

A1) Band-Resisted Squat

A2) Band-Resisted Push-Up

B1)  X-Band Walk

B2) 1-Arm Band Row

C1)  Band-Resisted Trunk Twist

C2) Band-Resisted Plank

5) GLIDERS: If you’re unfamiliar with this accessory, it looks just like one of those plastic plates you eat from at barbecues and cookouts. In fact, glider training can be successfully substituted with paper plates and they work on just about any floor surface. However smooth, bumpy-free concrete floors allow for the most rhythm and variety. The unique challenge with glider training is that you’re forced to work a little harder during the concentric phase because your feet and hands must drag or move the glider each time.

Sample Glider Training Program: Perform the exercises in each group 3 times, completing a group first before moving on to the next.

A1) Glider Alternating Reverse Lunge

A2) Glider Push-Up Fly (Modified or Regular)

B1) Glider Supine Hamstring Curl (Unilateral or Bilateral)

B2) Glider Prone Crunch

C1) Glider Bodysaw

C2) Glider Mountain Climbers


  • Make sure you warm-up the body dynamically and via some soft-tissue work to promote the flow of blood and oxygen to working muscles.
  • Notice I did not include specific number of reps because I want you to use good  judgement in determining that for yourself. If you perform 15 bodyweight squats on your first set and feel little to no challenge, perhaps you should perform 20 on your next set.
  • Because you won’t be doing any max effort work, keep your rest time between exercises and sets as minimal as possible. I recommend no longer than 90 seconds.
  • Another great way to make nontraditional training challenging is by documenting your workouts. This allows you to set new challenges and prevent you from regressing. For example if you rested 75 seconds between your TRX sets in week 1, increase the challenge by resting for 60 seconds in week 2.

Functional Training : A Brief Overview

Though extremely essential and vital for longevity, functional training may be one of the most overlooked and misunderstood areas of fitness. It is a term that was coined by rehabilitation therapists who had a sole objective of getting chronically injured patients to perform basic day-to-day activities again much simpler. For this reason, it has garnered a lot of mainstream recognition through the years but remains a mystery to some. How do you know if you’re training functionally? What exercises are considered functional?

It is important to know that functional training is designed to meet one specific demand only : performing a wide range of daily activities more efficiently without any potential risk for injury. It’s basically simulating basic movements at home, work and sporting activities. For example, a squat is a functional exercise in the sense that it trains and teaches the lower body muscles to be able to pick up an object from the ground. By performing this exercise routinely, the body is well equipped to handle any life situation that involves bending and hinging of the hips. The overhead press is another excellent functional exercise which trains the upper body and torso in reaching for items in our overhead kitchen cupboards and bedroom closets.

Keep in mind that common exercises like biceps curl, leg extensions, lateral raises and even the bench press, while aesthetically great for the body, have no functional benefits. Nothing we do in life simulates the actions of the aforementioned exercises. Can you think of any day-to-day activity that requires you to lay on your back and push an object upwards? How about one that requires you to bend your elbows with your arms fully extended? My point exactly.

Here are 4 reasons you should be doing functional training:

1. Across The Board: Just about anybody can participate in functional training. Whole body movements make up the template making it easy for an individual to utilize several muscle groups when doing a particular exercise. Resistance for functional training comes in many forms, from dumbbells, barbells, resistance bands to body weight, kettle bells and medicine balls making it universally accessible. The ability to perform basic everyday tasks much simpler and efficiently is more than enough incentive to train the body functionally and benefit exercisers of all levels and backgrounds. Older adults and sedentary individuals historically reap the most benefits due to years of inactivity and lack of movement.

2. Emphasis On Movement: One of the perks of functional training is the ability to effectively perform tasks in different planes of motion (i.e, different angles). As a result, movement is promoted and thereby encouraged. Think of multidirectional challenge involved in mopping the floor, vacuuming and doing gardening work. This movement in different directions subsequently incorporates other muscle groups. As I mentioned earlier, it is for this reason a case can be made against exercise machines that only isolate muscles and restrict movement as having functional benefits. The step-up exercise will yield more perks from a functional standpoint than the seated leg press machine, even though both exercises train the muscles of the lower body.

3. Core Stability:  Another important perk of functional training is the ability to integrate the core musculature. Functional training exercises are designed in a way so there is great deal of core stabilization. The squat and overhead press train the lower body and shoulder girdle respectively but there is core is stabilized and engaged to a great degree, although you won’t necessarily feel a ‘burn’ in your abs during these movements. The result is stronger abs and increased ability to control our bodies through different planes of motion and in the most adverse life situations.

4. Proprioceptive Enhancement: Performance of multi-joint and multidirectional exercises requires a good amount of concentration and alertness. Think about how zoned in you are when you do lunges or squat-to-press. Slips and falls in our society, especially among senior citizens, has been linked to poor balance and underdeveloped motor skills. Functional training addresses these areas by sharpening motor skills, decreasing the difficulty of balance and improving coordination. This is why functional training emphasizes the training of ‘movements’ and not just simply ‘muscles’.

Some of the best functional training exercises include squat, overhead press, step-up, lunges, medicine ball throws, kettle bell swings, rotational movements and pulling exercises.

5 Overrated Exercises You Shouldn’t Be Doing

Let me preface this blog post by saying the exercises about to be put under the microscope aren’t necessarily bad for you. As a fitness professional with a relentless mission of spreading the gospel of health and fitness to as many as possible, any form of physical activity is highly encouraged. A more physically active nation means a longer-lasting nation. However, there are quite a few exercises that I feel are a complete waste of your time and effort.

These exercises could very well be some of of your favorites and some of the premier exercises in fitness so I expect some of you to disagree with me. I truly believe these exercises are on the verge of being extinct. After some extensive research and experimenting, I’ve come to the conclusion that world of health and fitness is better off without the following 5 exercises:

1. SQUATS ON A BOSU BALL: Theoretically speaking, this movement makes no practical sense nor does it have any functional purpose. Doing squats on a bosu ball first gained popularity in the early 2000’s back when the ‘core’ craze was at its peak. It was thought that performing traditional exercises on unstable surfaces yielded the best core stability. I won’t dispute the fact that any squat variation trains the core stabilizers. If you routinely perform squats, you know the core is engaged a great deal. But why go through the daunting hassle of getting onto a bous ball to perform a squat when you can easily perform a traditional back squat and reap the same exact benefits? Furthermore, a case study conducted a month ago in Slovakia showed that squats performed on unstable surfaces greatly affected the concentric portion of the lift when compared to a stable surface like the floor. A 2013 research from the Journal of Strength & Conditioning also concluded that squats on a bosu ball resulted in lower EMG activity and force production in comparison to floor squats.

Surfers are perhaps the only group of people who may benefit from squatting on a bosu ball because of the amount of instability they have to deal with, not to mention how eerily identical both movements are. Other than these select few, everyone else should just stick to traditional squat variations.

2. UPRIGHT ROW: This exercise was made popular by bodybuilders in the early days and recruits the muscles of the trapezius, middle deltoids and to a small extent the biceps. It is often incorporated with overhead pressing movements and rows. I’ll admit that once upon a time I regularly performed barbell upright rows. Growing up around older lifters who adopted the 70’s and 80’s way of strength training, I had no choice but to acquiesce. But over the years, I’ve come to realize that this exercise is an utter waste. The biggest concern with this exercise is the internal rotation of the humerus at the top, which has been linked to shoulder impingement. When performed over time, the overhead movement of the arm plus internal rotation of the humerus stresses the subacromial joint. A 2011 research article in the Strength and Conditioning Journal supports this theory.

A traditional deadlift will effectively work the trapezius along with a host of other muscles and will prevent any use of the shoulder. The rear deltoid and other upper posterior muscles can be targeted with behind-the-back band pull-apart and Face Pull. The middle deltoids and biceps can be trained via lateral raises and any biceps curling movement respectively.

3. SIDE BEND: Almost every gym goer I know has performed (some still do) this exercise at some point. The side bend is a unilateral movement performed as an abdominal exercise to work the internal and external obliques. For those unfamiliar with it, it requires holding a single dumbbell or weight plate in one hand and tilting the body sideways and back to upright. Anatomically speaking this is an action of the body known as lateral flexion of the spine which uses a small muscle of the lower back called Quadratus Lumborum, or QL. By definition, the QL originates from the posterior iliac crest and inserts on the 12th rib and lumbar vertebrae. The QL also aids in extension of the lumbar spine and is associated with low back pain via prolonged seating and weak gluteus medius and minimus. Thus when you do a side bend, you’re actually working your lumbar region, not your obliques.

QuadratusLumborum

While side bending with a decent amount of resistance could potentially lead to a stronger low back, it has ZERO impact on the abdominal muscle group. Besides, compound movements like the squat and deadlift are ideal low back strengthening exercises that also offer a plethora of other benefits. For those looking to work their obliques, any anti-lateral flexion, i.e., resisting going into spinal lateral flexion (barbell rainbows, suitcase deadlift) or anti-rotation (pallof press) exercises will be ideal.

4. WHOLE-BODY VIBRATION: Simply put, whole-body vibration (WBV) is the use of vibration devices to strengthen the body. The most popular of this device is the Power Plate which originated in Russia and quickly spread through Europe and Japan before arriving on U.S soil. Experts of this device maintain that vibration transmission of energy into the body can help with weight loss, core strength, increased bone density amongst other things. I took a Power Plate introduction course in 2009 and have occasionally incorporated it into various segments of training programs of my clients and I.

Today I question the effectiveness of the device. While it can serve as a passive warm-up prior to strength and aerobic training (which I use on myself and a few of my clients), there is inconclusive findings to support the claims of weight loss, hypertrophy and core strength. In fact many of the promised benefits aren’t backed by research. There isn’t sufficient evidence to support these claims and it is my belief this device is on its way to extinction. On a small positive note, it appears sedentary individuals and chronically ill patients may benefit initially from WBV training.

5. GLUTE KICKBACK: If you’re a woman reading this, you probably already have a frown across your face. This is one of the most common butt exercises women love to do. Also known as ‘Donkey Kick’ or ‘Single-Leg Hip Extension’, it is performed from a quadruped position and involves pushing the foot of each leg towards the ceiling (from the knee) one at a time, usually with ankle weights strapped to each ankle. Some gyms even have machines that mimic this action from an upright position. My concern is that most women always hyperextend their lumbar spines when doing this exercise making it counterproductive. While effective, it expends way too much energy due to the unilateral nature of it and requires a good amount of effort to yield desirable outcomes.

glute-kickback-overrated_ph

As a substitute, perform any variation of the deadlift and squat, reverse lunges and hip thrusts. Simply put, no exercise activates the glutes better than the hip thrust.

Fine-tuning The Pull-Up

The pull-up is one of the most popular bodyweight exercises and widely regarded as the perfect complement to the push-up. It’s also one of the premier exercises for upper body strength and development as evident by its use in assessing upper body muscular strength and endurance by various sectors of the world including our armed forces. Unfortunately most people have loathed pull-ups from the time they were asked to perform them as part of the mandatory physical fitness test in high school. It is for this reason many people substitute other pulling exercises like seated rows for pull-ups in their strength training programs.

Another reason most people don’t do pull-ups is because of the gravity component. Isaac Newton‘s laws of gravity says in part that whatever goes up must come down. Gravity is that force that attracts or pulls a body towards the earth. This means every time a person does a pull-up, they have to resist gravitational forces trying to pull them down. According to Newton, the mass or object has a direct correlation with gravity. This is why lighter individuals can generally perform more pull-ups than heavier individuals. But that doesn’t mean heavier individuals can’t or shouldn’t perform pull-ups. It’s a matter of mastering the technique and repeated practice sessions.

There are several modifications that allow the pull-up to be made possible. But before I get into that, let’s get a basic anatomical and biomechanical understanding of this bodyweight exercise.

The pull-up is a multi-joint, closed-chain exercise that requires just a bar for its execution (modern day cable pulley stations now have specially-designed pull-up handles for ease). It is performed with an overhand grip with the latissimus dorsi as the prime mover and the biceps and forearm as secondary small muscles. Because the lats internally rotate the shoulder and humerus, posterior muscles like the teres major and trapezius also get some work. The flexion of the elbow joint at the top causes the contraction of the biceps while the brachioradialis get engaged via extension of the wrist.

A standard pull-up requires the body to begin hanging with arms fully extended from an overhead bar or pull-up handle bars. The movement begins with pulling of the body upwards until the chin clears the bar followed by a controlled lowering back to the starting point. Though debatable, I prefer the elbows to remain slightly bent at the bottom so there is constant tension in the muscles being worked. Grip width varies in individuals and is usually determined by the most number of repetitions that can be completed. Although there isn’t a universally accepted grip, the shoulder-width grip or slightly wider is generally utilized. Crossing of the ankles, extension/flexion of the knees and hips don’t necessarily make a difference and are usually based on individual preferences. But ‘kipping’ (generating upward forceful movement of the legs to gain momentum), which was popularized by the CrossFit movement, should be avoided because it devalues the engagement and importance of the upper body work. (I’ll address the controversial training methods of CrossFit in one of my subsequent blogs).

Unlike a pull-up which uses a pronated grip, a chin-up uses an underhand (supinated). Both exercises are similar in nature but their names shouldn’t be used interchangeably. The chin-up emphasizes a greater degree of biceps contraction than lat work while the pull-up does the exact opposite: more lat contraction and less biceps work. This is because the elbow flexion line of pull in the chin up is greater than in the pull up due to ‘tucking in’ of the elbows. In other words, if one were pictured at the top of a chin-up, it would look like the top position of a barbell biceps curl.

Apr16-2013Daniel-001-ed2Apr16-2013Daniel-010-ed2

So what if a person can’t do a single pull-up? All hope isn’t lost. Here are 4 ways to make the pull-up a little easier:

1. Partner Assistance: This method requires a partner to hold on to the legs, ankles, waist or hips of the person doing the pull-up. By doing so, the exerciser pulls only the torso of the body resulting in less weight. The partner can also provide just enough ‘forced rep’ to help the exerciser get the full ROM. It is important that the partner let the exerciser ‘pull-up’ with as much effort as possible and only assist when a sticking point is reached.

2. Strength Bands: This is becoming one of the more common modifications of the pull-up. It requires the use of strength resistance bands which come in different sizes and tensions. One end of the band is looped over the middle of the pull-up bar while the other end goes over the feet or knees. Although the challenge is greater at the top where the band is slack, the bottom of the pull-up, where most people struggle, is where it’ll be most helpful. It is important to know that the greater the tension of the band, the more assistance it provides. Also multiple limbs (both feet, both knees) on the band require more effort and use less assistance than single limb (one foot, one knee). I utilize strength bands for pull-ups with most of my clients.

3. Assisted Pull-Up Machine: Every commercial gym has at least one assisted pull-up machine. It is ideal for deconditioned individuals and rehabbing patients. Its premise is similar to that of strength bands in terms of assistance from the machine. A decent amount of weight should be selected for a challenging number of reps with good form. The resistance should continually decrease over time until the person is able to perform one or two unassited pull-up.

4. Lat Pulldown: This is best regression of the pull-up. It essentially uses the same exact muscle groups but allows the lower body to take a break. So which is better, the pull-up or lat pulldown? It’s a matter of preference, training goals and comfort level. If your goals are to maintain an optimal level of fitness, either one is fine. However the lat pulldown pales in comparison to the pull-up in terms of greater isometric contraction in the hands leading to enhanced grip strength and forearm development. A 2009 study in the Journal of Strength & Conditioning Research showed the pull-up as having an impact on lean body mass. This comes as no surprise since the pull-up is a staple in strength training and hypertrophy programs.

The pull-up has been around for many years and is certainly here to stay. But because of the level of difficulty, many people refrain from doing it often. It is a fantastic exercise for developing upper body strength, improving grip strength, increasing lean body mass and even using various trunk stabilizers to keep the abs engaged. If you’ve never done a pull-up before or can barely do a few unassited reps, try one of the aforementioned modifications the next time you’re at the gym. Your body will adapt over time and soon you’ll find yourself doing unassited pull-ups. If you’re an elite trainee than can do a lot of pull-ups with relative ease, increase the challenge by attaching additional resistance (in the form of weight plates) via a dip belt. Another way to make it challenging is by pulling the chest towards the bar as opposed to just clearing it. This requires more effort thereby making the lats and forearms work a little harder.

The truth and science behind abdominal training

Abdominal training is just as polarizing and controversial a topic as abortion is in our country. Almost everyone has a different opinion and it always tend to spark big debates (I had one yesterday with a buddy of mine). Our abdominal muscles (transverse abdominis, rectus abdominis, internal oblique and external oblique) are designed to assist us in trunk flexion, rotation and side bending. They also provide stability to our trunk and keep it rigid.

We engage our abs unknowingly most of the time when running most of our daily errands so our gym ab work shouldn’t have to be too long. Walk into any gym in your neighborhood and chances are half the people in there are training their abs via endless sets and repetitions. They are arguably the most obsessively trained muscle group in commercial gyms and health clubs today. But according to research and practical theory, we only should be training our abs with a select few exercises.

The following 4 categories of abdominal training will make your ab work at the gym more efficient and effective:

1. ANTI-EXTENSION EXERCISES: These are exercises in which you try to resist the trunk from going into lumbar extensions. The Plank, Pike and Roll-Out are some examples. In all 3 exercises,  the lumbar spine naturally wants to ‘sink low’ but you have to make sure your don’t arch’ your back or let your hips dip to low into lumbar extension. This resistance from you makes anti-extension exercises a staple in abdominal training.

2. ANTI-LATERAL FLEXION EXERCISES: These exercises cause the resistance against tilting, side-bending or lateral flexion of the trunk. Barbell Rainbows, Suitcase Deadlift and Waiter’s Walk are some of the popular ones. In all exercises, you have to keep your trunk stabilized and rigid to avoid tilting laterally. The resistance provided by you causes contraction in the abdominals and oblique muscles.

3. ANTI-ROTATION EXERCISES: The Pallof Press (all variations), renegade rows and 1-arm plank variations are best choices in this category. The Pallof Press may be the most effective, as it also activates the shoulder girdle and hip abductors. Again, naturally the trunk and hip want to rotate and you have to resist against those rotational forces. The Barbell Rainbow is also an anti-rotation exercise.

4. HIP FLEXION EXERCISES: Hanging leg raises, reverse crunch and prone jackknife are the ideal choices here. Unlike the first 3, where stability is the challenge, these exercises traditionally contract the abs eccentrically and concentrically. The hip flexors, the muscles responsible for bringing the knees and trunk together (psoas and iliacus), are the primary movers of these exercises. These exercises usually create a much more quicker ‘burn effect’ on the abs than the above 3 so people tend to perform them more often.

WARNING: Too much hip flexion exercises can tighten the hip flexors thereby leading to chronic pains and even injuries. This is even riskier for those with desk jobs who sit for an extended period of time. Because we already use our hip flexors when we walk, climb stairs and bend over, the objective here should be to try and limit their involvement as much as possible when we train our abs.

Keep in mind, abdominal training should not be confused with core training. Although both of their training modalities overlap, one can have a sculpted set of abdominals but also have a weak core. Having washboard abs is a result and testament of genetic potential, diet and lifestyle management. Development of a strong core is based on the ability to resist forces against the lumbar spine and hip complex. Powerlifters with pot and beer bellies and athletes possess some of the strongest core musculature. Powerlifters have to resist stability forces in complex movements like the squat, clean and jerk, deadlift and overhead press while athletes are constantly resisting lateral and rotational stability forces in their sports.

I hope I was able to shed some light on abdominal training. You don’t need to be spending endless amounts of time training your abs. Depending on your training schedule, select 1 or 2 exercises from each category listed above and perform them at a challenging effort level. 2 to 3 sets of 10 to 15 reps will suffice. Remember, a clean and solid diet will ultimately determine how sculpted your abs will get.

Here’s a sample ab routine for a person who trains 4 days a week:

DAY 1: Anti-Extension (Plank : 3 sets of a challenging hold time)

DAY 2: Anti-Rotation (Pallof Press: 3 sets x 15-25 seconds hold per side)

DAY 3: Hip Flexion (Reverse Crunches: 3 sets x 12-15 reps)

DAY 4: Anti-Lateral Flexion (Suitcase Deadlift: 3 sets x 12-15 reps)