5 exercises you should stop doing

For a lot of us fitness enthusiasts, working out is an integral part of our lifestyle. We enjoy the sweat, the burn, the pump and more importantly, those endorphins that we release and stay with us long after we leave the gym. By now we know resistance/strength training is essential for weight loss, muscle gain and strength. But with a plethora of exercises out there, it can be overwhelming to find the right ones. The fitness industry is always evolving and newer exercises continue to hit the scene.

But how do you know you’re doing the right exercises? I’m not talking about proper form but rather the selection. While any resistance training exercise is better than none at all, some have better bang-for-your-buck value and will yield more dividends. As a fitness professional/fitness enthusiast who’s been a part of fitness for nearly 15 years, I can say confidently that there are some exercises better left alone.

Here are 5 exercises you should stop doing:

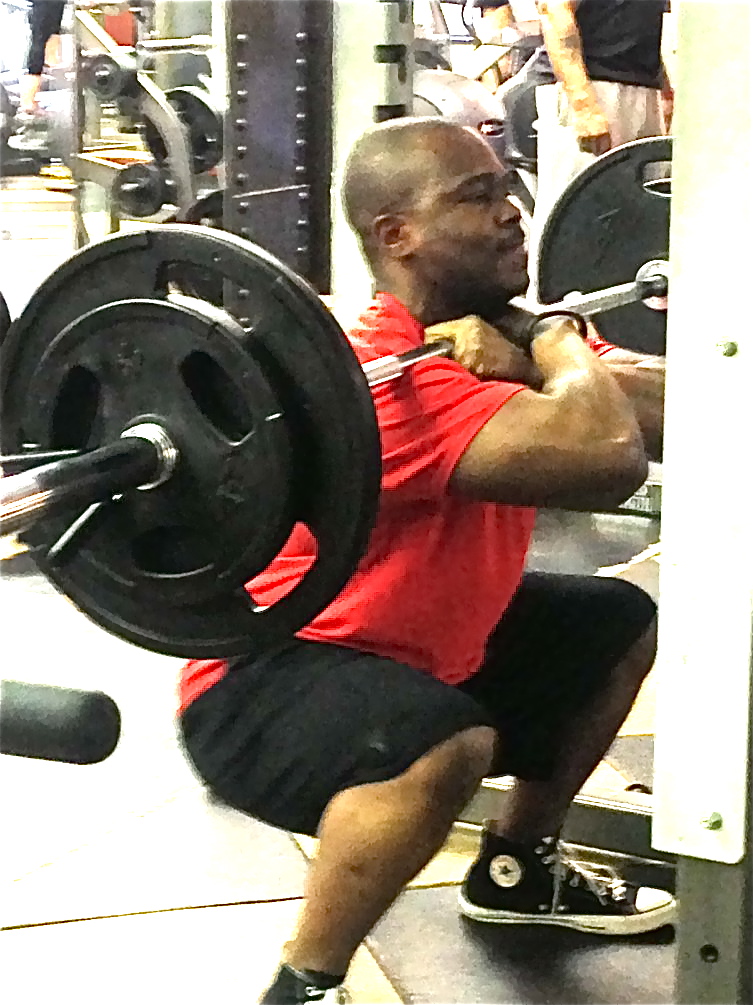
LEG PRESS: A lot of guys are going to balk at me for this but the leg press has zero functional or core value. The seated, upright version may be ideal initially for elderly and deconditioned individuals. But the traditional, incline version can be hard on the knees not to mention its high risk of injury because of the angle. Although most guys, especially bodybuilders who want to build extreme mass, may be able to load a lot of weight, they also risk knee pain and back injuries later on.

ALTERNATIVE: The traditional barbell back squat offers way more bang for your buck while utilizing your core and trunk stabilizers. Also, because you’re moving a load through space, as opposed to your back fixed against a chair, you’ll build more strength and power. As an added bonus, how’s this for a fit nugget: There are over 600 muscles in the body and the squat is known to work at least half of them!

UPRIGHT ROW/BEHIND-THE-NECK LAT PULLDOWN: The upright row is a popular shoulder exercise that made its name during the early era of bodybuilding. It is thought to work the rhomboids and other mid-trap muscles. The behind-the-neck lat pulldown is kind of a modern modification of the traditional lat pulldown. Those who do it routinely claim it targets the mid-trap region very intensely. However several studies have linked these two exercises to acromiclavicular joint injury. The clavicle and acromium make up the AC joint. When the aforementioned exercises are performed, the ligaments around those joints stretch further away causing laxity. This is what ultimately leads to AC joint injuries like a fractured collarbone or torn labrum.

ALTERNATIVE: Face Pulls and Band Pull-Aparts (front or behind the body) are safer bets. They put very little pressure on the AC joint and don’t require a lot of weight to feel the burn.

SEATED HIP ABDUCTION/ADDUCTION MACHINE: I really wish fitness manufacturing companies would stop making these machines. Ladies, you can’t spot reduce! It’s virtually impossible. What’s more alarming is these are two of the most popular and utilized machines in every gym. Yes you may feel a burn when you’re on these machines but the muscles you’re targeting (hip external rotators/adductors) are not getting the proper challenge they need. Being glued on a chair with a back support robs the trunk stabilizers and glutes of adequate firing.

ALTERNATIVE: Band-resisted clamshells and band-resisted side stepping are arguably the two most effective exercises for working the glute medius and other hip external rotators. The sumo squat, sumo deadlift and various lunge variations all do a great job of targeting the inner thighs and several other hip adductors.

DUMBBELL SIDE BEND: I still don’t know why people think the dumbbell side bend target the obliques. Simply put, it doesn’t. In a nutshell, the anatomical motion of the side bend is lateral flexion of the spine. When this movement occurs, the primary muscle that is targeted is a deep muscle on the side of the lower back called Quadratus Lumborum or QL for short. Although there’s nothing wrong withe using the dumbbell side bend to work your QL, you’ll get more perks and benefits with compound movements like the squat and deadlift.

ALTERNATIVE: The side bridge, in my estimation, remains one of the most effective exercises for the obliques. If you have preexisting shoulder pain or just weak shoulders, try doing the side bridge with a hip drop to the ground.

DONKEY KICK-BACKS: Popularized by Jane Fonda in the 80’s, this exercise was the premier movement women used to shape their butts. I still see many women doing it today with ankle weights or resistance bands. The problem with this exercise is 9 out of 10 women I see doing it grossly compensate lumbar hyperextension for hip extension, thereby making it counterproductive. Also, it takes an insanely number of reps to be able to feel a good burn.

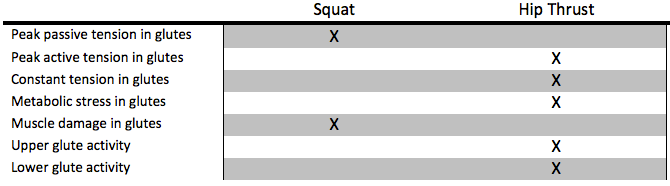
ALTERNATIVE: I don’t know if the donkey kick-back will ever be extinct but current literature shows and endorses the hip thrust as the most effective exercise for pure glute activation. Unlike the squat, the hip thrust relies a great deal on the gluteal muscle than the hamstring and lower back during maximal contraction.

Squats Vs. Hip Thrusts – Which Is Better For The Glutes?

Ask anybody at your local gym what exercise they think is best for the backside. I can confidently say most people will say it’s the squat. From the beginning of time, the squat has been associated with developing and building strong gluteal muscles. The backside of the human body has become an essential part of many training programs. Athletes require a strong posterior chain for optimal performance in their sports. Society’s obsession, though mostly women, for a firmer, tighter and rounder butt is at its highest. In fact, many women I come across these days tell me they want bigger butts. The butt craze is in full effect!

So what is the best exercise for building the backside?

For years, the traditional squat was the go-to movement for butt and still remains a fantastic choice. But in recent years the hip thrust has gained popularity and emerged as a true rival for gluteal development. No research comparing the two exercises and its effect on the glutes had been conducted until Bret Contreras (www.gluteguy.com), the creator of the hip thrust, conducted one. Bret examines 3 key factors that impact muscle growth and development : mechanical tension, metabolic stress and muscle damage on the gluteal muscles. Majority of this is based on his findings.

Gluteal Biomechanics During Squat: Glute activation during a sub-max effort on a barbell squat isn’t what most people think it is. With the loaded bar on your shoulder, the glutes are relaxed and only begin to contract during the eccentric phase. Contraction during descent is very low and lowest at the bottom of the squat. In fact, research now shows that a ‘bucket squat’ or going too deep has little to no impact on the backside.  The most amount of muscle contraction and activation takes place during the concentric phase; as you drive explosively upward from the bottom of the squat. Maximal contraction takes place during the middle of the rep, and slowly dissipates as you get back to the top.

Generally speaking, gluteal activation at the lowest phase of the squat is about 10-20% of maximal contraction, 20-30% at the start of the eccentric phase and 80-120% at the start and during the concentric phase. Overall the average gluteal activation percentage is about 60% of maximal contraction.

Gluteal Biomechanics During Hip Thrust: Using a sub-max load, the barbell hip thrust challenges the gluteal muscles a bit different from the squat. At the start of the movement, when the barbell is placed on the hip, the glutes are relaxed.  The lifter thrusts the hips concentrically upwards until full hip extension is reached. Average gluteal activation during this phase is about 160% of maximal contraction. Keep in mind that full hip extension must be achieved (squeezing the buttocks as hard as possible at the top of the lift) for full benefits to be reaped. Unlike a barbell squat where the glutes are relaxed at the top, the gravity effect on the hip thrust (the barbell constantly trying to push you back down from the top) inevitably places constant tension on the gluteal fibers resulting in more of a burn.

There is little to no hamstring activation during the barbell hip thrusts. However, when the drive occurs at the balls of the feet as opposed to the heels, some may get some hamstring work. As a rule of thumb, the heels should always be favored.

Squat:Hip Thrust

Conclusion: Both the squat and hip thrust are excellent choices for building the backside. The fact that both movements keep the knees in a bent position means there is limited hamstring activation due to its shortening and therefore more involvement of the gluteal muscles. The hamstrings can only fire maximally when they’re continually lengthened. Although both exercises require hip extension which forces gluteal activation, the minimal activation during the eccentric phase and the lack of tension at the top of the squat doesn’t cause immediate burn and soreness unlike the hip thrust where there is constant tension. However because the fibers get a deeper stretch eccentrically during the squat more than the hip thrust, a lifter is highly likely to get sore in the days following a sub-max squat workout. The only small drawback is the lower back strength limits the load a lifter can use on the barbell squat and quadriceps and hamstrings activation takes away from maximal gluteal activation. The hip thrust, though easier to perform, is limited by glute strength, meaning once the glutes get tired from firing, a lifter will no longer be able to thrust thereby ending the set.

So which is the better choice for the backside?

Based on what the research shows, both exercises build and develop the gluteal muscles effectively and should be incorporated in a training program. Though the hip thrust offers more gluteal bang-for-your-buck results, it shouldn’t be necessarily favored over the squat nor should it replace it entirely. The barbell squat engages more of the lower gluteal fibers than upper fibers whereas the hip thrust fully activate both fibers. If you want a fully developed butt, you’ll have to routinely perform these two exercises. Performing only one and not the other will rob you of the full results. Both can be performed during a workout session or on separate days. The load must be challenging enough in order to illicit good gains. Generally speaking, a sub-max effort of about 75% of 1RM should suffice. Ideal rep range should be between 8 and 15.

Keep in mind that the front squat and goblet squat, which place emphasis on the front side of the body and anterior core, has very minimal impact on the backside and therefore can’t be relied upon for maximal gluteal development. While both exercises are low-back and knee friendlier than the back squat, they don’t fire the glutes nearly as hard due to the placement of the load.  As a bonus, the deadlift along with other gluteal isolation exercises like the reverse lunge, stiff-legged deadlift and hip abduction movements will yield one heck of a backside.


Preventing Knee And Back Pain By Improving Hip Mobility

The hip complex is indeed a very complex joint –  no pun intended. It is responsible for almost every action we execute everyday. Like the shoulder, it is a a ball and socket joint which is capable of movements in all three planes of motion. In all my years in the fitness industry, I’ve noticed that the knee and hip joints of people seem to be the most vulnerable to injury. Some of you reading this have had your share of these joint pains. Some of these pains and injuies are due to falls, natural disasters and playing sports. However, many are a result of infrequent training of the hip complex and poor exercise selection leading to compensation of the knee and ankle joints.

If you look at the human body, you’ll see that the hip is located at the center of the body. This makes it come into play nearly every time we perform a task or action. Sitting, getting up, climbing stairs, playing sports, running and a plethora of other activities require hip involvement. But many of us have hip mobility issues, and because the body is one big chain of stack of joints, hip immobility can affect the knee and ankle joints. Many joint aches and pains can actually be resolved by strengthening the muscles of the surrounding joints. Even low back pain can be attributed to poor hip mobility. If the gluteus maximus muscle group is weak, it forces the opposing hip flexors to shorten and subsequently pull on the low back in seated positions. If the gluteus muscles, hip external and internal rotators are not trained often enough, it won’t be long before the knees, low back and even ankles are forced to compensate themselves in hip-dominant activities.

MUSCLES-OF-HIP

By strengthening the muscles of the hip, the lumbar spine is better equipped to handle everyday stress of life. Barbell squat, deadlift, single-leg squat, reverse lunges, hip thrust, step-up and certain quadruped exercises are some excellent choices for improving hip mobility and strengthening the muscles. Flexibility in the hip flexors, hamstrings, adductors and hip external rotators is also key to achieving and maintaining a strong and pliable hip joint. Active stretching and myofascial work will help improve flexibility in these muscles while keeping them lose and warm. The foam roller is arguably the most vital fitness accessory because of  its impact in reliving the body of aches, inflammation and tightness. Myofascial work via foam rolling or lacrosse and tennis balls may be advantageous over stretching because of its ability to go deep into muscle tissue.

Whether you’re an all-around gym enthusiast, an athlete or weekend warrior, hip mobility is crucial for long health and prevention of  injury. A training program that addresses strengthening of the hip muscles and improvement of flexibility will successfully achieve this goal.

Machines Vs. Free Weights

If you’ve been an avid  gym exerciser for at least couple of years, then you must be familiar with the ongoing debate between free weights and machines. It is one of the most heated and polarizing topics in the fitness with so many biased opinions. When I was growing up, the older guys I lifted with made me use free weights and told me never to use machines. They demeaned machines saying it was for the weak and lazy. So many case studies over the years concluded that free weights are advantageous over machines when it comes to maximal strength, bone density, fat loss and muscle mass.

So machines are useless and should be extinct right?

Well, not necessarily. It’s scientifically true that training with free weights (barbells, dumbbells, body weight, etc) have more benefits than machines. The proof is in the pudding : Increased range of motion, development of maximal strength, best potential for hypertrophy, stronger bones due to increased tension and building maximal power are some of the great benefits of using free weights. An overwhelming part of my workout programs and that of my clients are centered around free weights. I’m a firm believer in them.

However, machines also have their benefits and can be incorporated into workout programs. Certain people may also benefit a great deal from machines. It is important to identify the fitness goal at hand and the training level of the individual when utilizing machines. While the use of machines will never be as popular as that of free weights, they can still be used in some capacity.

Here are  3 ways machines can be used:

1. Sedentary & De-Conditioned Individuals: These are people so inactive that walking up a flight of stairs can be a daunting task. Sedentary and de-conditioned individuals have little to no muscular strength and endurance. Their muscles are so weak and tendons very wound up. For these reasons, these people are better off starting off with machines, where there is easier range of motion and controlled directional force. As the body adapts over time, free weights should be used.

2. Isolating Muscle Groups: When it comes to lean mass, free weights is the undisputed king. No question about it. However certain small muscle groups may benefit a great deal from the use of machines. Small muscles like the gluteus minimus and medius, anterior deltoid, biceps and calf muscles can be individually targeted through the use of machines for better definition. Keep in mind, these muscles should already be activated via compound movements before being isolated for better accentuation. Examples are the hip abduction (gluteus minimus and medius) and seated shoulder press (anterior deltoid) machines.

3. De-Loading: The term ‘de-load‘ refers to lowering the intensity and volume of training for a period of time. It basically means, taking some ‘load’ off your current workload. Though not set in stone, de-load phases typically occur following 3 to 4 weeks of moderate to intense training and can last anywhere from 7 to 10 days. During this phase, a free weight exerciser can use machines to lighten and lower his/her workload. It’s basically a way of giving the body a break while still training it at a decreased intensity.

Remember, I’m not advocating the notion that machines are better than free weights. Both are effective and impactful for muscular strength, lean muscle, fat loss, increased bone density and decreased LDL. However, machines do offer some advantages that could benefit certain individuals. In my humble estimation, they should be routinely performed providing the fitness goals at hand are being addressed properly.

4 Popular Exercises With Progressions For Better Gains

About a month and a half ago, I wrote a blog post on ways to make your workouts more fun and challenging. In that blog I mentioned increasing volume, decreasing rest periods and changing the sequence of your workouts as some of the ways to achieve that feat. In this week’s blog, I’m going to dig deeper and show you how to make some of your favorite exercises more challenging.

So many popular gym exercises need to be fine-tuned every now and then to yield more bang-for-your-buck gains and to avoid boredom and monotony. If you’re an avid exerciser who works out at least 3 days a week, chances are you get complacent with your workouts regularly. It’s inevitable, even if you’re the strongest and most conditioned person at your local gym. The fact of the matter is the body needs continual challenges for continued upward progressions.

Here are 4 popular gym exercises that can be progressed to a greater degree of difficulty:

1. TRX Push-Up: Suspension training has completely taken the fitness industry by storm and has become an essential part of all exercise programs. The TRX Suspension Trainer is by far the most popular and most utilized amongst fitness enthusiasts. The Push-Up is arguably the most common exercise done with this exercise accessory tool.

The Challenge : TRX Decline Push-Up: Place a plyo box or aerobic step (knee-height high) 4 to 6 feet in front of a fully extended hanging TRX. Assume a decline stance by placing your feet on the box as you simultaneously reach for the handles with your hands. Perform decline push-ups. The extra elevation will force your anterior core to work harder due to increased contraction via anti-extension. Your pecs will also get a deeper stretch at the bottom of this movement. This is a very advanced movement so you must be able to perform regular TRX Push-ups before attempting this.

2. Hip Abduction Machine: A very popular exercise machine that works the glutes and used mostly by women who regularly work out at gyms. Although it’s not a ‘women-only’ exercise, majority of its users are women who are in relentless pursuit of a nicely, shaped butt. The term ‘hip abduction’ is a joint action that uses the gluteus minimus and medius, the muscles on the side of your butt.

The Challenge : Partial Squat On Hip Abduction Machine: Place your feet on the foot cradles on the hip abduction machine but do not sit. Instead drop down to a partial squat and perform the movement. The isometric squat stance will bring your, gluteus maximus, quadriceps and hamstrings into play, which you wouldn’t get sitting down. The added external rotation of the hip will force your gluteus minimus and medius to work harder also. You should try to achieve a considerable isometric squat stance to reap the full benefits.

3. Deadlift: I’ve talked about this exercise in many of my blogs so I’ll keep this short. The Deadlift is one of the important compound movements for building strength, power, fat burn, lean muscle and improving posture.

The Challenge : Deadlift With Strength Bands: For those unfamiliar with strength bands, they’re basically rubber bands in larger sizes and with greater tension. They are mostly used by elite athletes and powerlifters but can be incorporated into just about any workout program. Place a medium or heavy strength band over the middle of an olympic barbell. Step on the part of the band that’s resting on the floor with a hip width stance. The band should be right on the arches of your feet. Place your hands on the barbell, just outside the 2 points where the band is over the barbell. Explosively drive through your feet and deadlift. The tension from the band will constantly try to pull you down during both the concentric and eccentric phases. This forces the use of more power, force and speed which will yield more calories burned, improved strength and size. The tension of the strength bands is the key to achieving these benefits so the weight on the barbell should be kept to a minimum.

4. Reverse Lunge: The most knee-friendly of all lunges, the reverse lunge is the only lunge variation I do these days. We all know it isolates the muscles of the butt and thigh but it also stretches the hip flexor at the bottom of the movement. If you have back and/or knee pain, this exercise is ideal for you!

The Challenge : Reverse Lunge With Front Squat Grip: This is highly advanced progression that should be done with caution. You must know how to do a barbell front squat before attempting this. Using fairly light load, assume a barbell front squat stance in a squat rack. With the barbell resting on your fingers or shoulders (depending on the grip you use), do alternating reverse lunges. Because the center of gravity is being moved upward, farther away from the base of support, the balance challenge becomes much more difficult. The anterior core is engaged a great deal that you literally will feel a ‘burn’ in your abs while doing this movement. You’re going to wobble every now and then so be very slow and controlled on your decent.

A case for the front squat.

Based on my observation and experience over the years, a large number of trainees rarely incorporate the front squat in their lower body training. In fact, I can argue that even the most obsessed lifter at your gym has never performed a front squat. There are several reasons for this. Many who routinely perform the traditional back squat have never been properly taught how to execute a front squat while some that have an understanding of the exercise chose not to do it because of the discomfort it puts on the shoulder and wrist.

While both are legitimate reasons against doing the front squat, the research shows that it is a far more knee and lower back friendly exercise than the back squat.

All squat variations illicit compressive and shear forces on the knee joint and lumbar spine. These forces are also evident in almost every human movement pattern that require the hips and knees (stair climbing, getting up from a chair, ice skating, etc). However it is the compressive forces that cause the most degenerative damage to the cartilage and ligaments of the knee. According to a 2009 research study conducted by Gullet JC, Tillman MD, Guiterrez GM, and Chow JW that measured the force and torque during a squat, the back squat resulted in more compressive forces on the knee and back than the front squat. A person with a herniated disc or pinched nerve in their lower back will only do more damage by loading weight on a back that’s already inflamed. Staying in a neutral spine is the safest way that person can perform most traditional exercises.

Because of the upright position of a front squat, there is significant less torque on the lumbar spine during descent. For this reason, those with chronic and degenerative lumbar and knee ailments could benefit greatly from the front squat. Aside from that, the same study concluded that the front squat is a better Quadriceps developer than the back squat because the quads are stretched further in the bottom position. The back squat will continue to activate virtually every muscle of the lower body (most notably quads, hamstrings, gluteus maximus) with very little work on the gluteus medius and minimus and burn the most calories. But if the goal is to develop and sculpt the quads, then the front squat is the remedy.

The front squat is a very unique exercise that requires precision and near-perfect functional mechanics for proper execution. Unlike a back squat where the barbell sits on the upper shelf of the shoulder blades, the front squat places the load in front of the body and can be performed in two ways. The conventional clean-grip is the ancient and most common. Using this method, the shoulders are flexed under the barbell while the elbows flex so both the shoulders and elbows are aligned horizontally. The final part requires extending the wrists under the bar.

The second way is much easier on the shoulders, especially in those with poor shoulder mobility and flexibility. Known as the ‘cross-grip’, both shoulders are flexed under the bar while opposite hands are crossed and placed on barbell over opposite anterior deltoids. The challenging part about this method is that you have to essentially hold on tight and press the barbell hard especially during descent to prevent the bar from rolling over the shoulder. Because of my limited shoulder and wrist mobility, I prefer this method over the clean-grip.

I’d strongly suggest you perform the front squat regularly in your training (if you’re currently not doing it) to allow for the knees and lower back to take a break from compressive forces. The back squat will remain the most universally accepted and performed squat variation. But we can avoid excess torque and tension on our knees and backs by incorporating the front squat occasionally. If you’ve never done a front squat before, start with a PVC pipe or a broom stick to learn the fundamentals and mechanics.

Regardless of the method you elect to go with, the front squat could be very uncomfortable to perform initially because of the position of the bar. But don’t get discouraged or frustrated. After a few practice sessions, you’ll get it! Shoulder, elbow and wrist flexibility all impact performance and could call for additional mobility work and dynamic stretches. Keep in mind that the kinetic chain of the body has to function well for any squat variation to execute perfectly. If you have ankle and knee mobility issues or trunk instability patterns, you may want to dial back and address those via corrective exercise training before performing a squat. Because of the position of the bar placement in the front squat, one will never be able to front squat more weight than back squat. It is virtually impossible.

-1